
How To Set The Best EQ Settings For Better Sound Quality?

You play a song you know by heart, and something’s off. The bass booms like it’s coming through a wall, or the vocals sound like they’re stuck behind one. Now, the right EQ can fix that. Your audio will be warmer, clearer, fuller, or less harsh.
But there are no one-size-fits-all EQ settings. Your device, the recording, and your own ears all change what “best” means. So instead of a magic preset, you’ll learn a repeatable process: identify a sound problem, adjust the relevant part of the EQ curve, then compare the result.
How to Read and Understand an EQ Curve
What Do the Horizontal and Vertical Axes Mean?
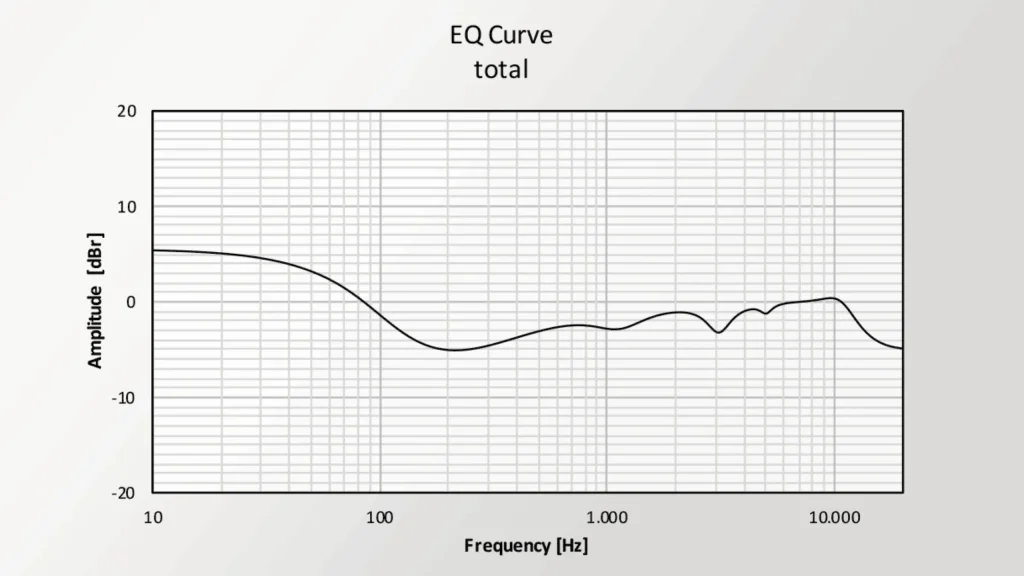
Open any EQ, and you’ll see a frequency-response graph with a line running across it. Here’s how to read it.:
- Horizontal axis: frequency, from low bass on the left (about 20 Hz) to high treble on the right (about 20 kHz).
- Vertical axis: gain, measured in decibels (dB).
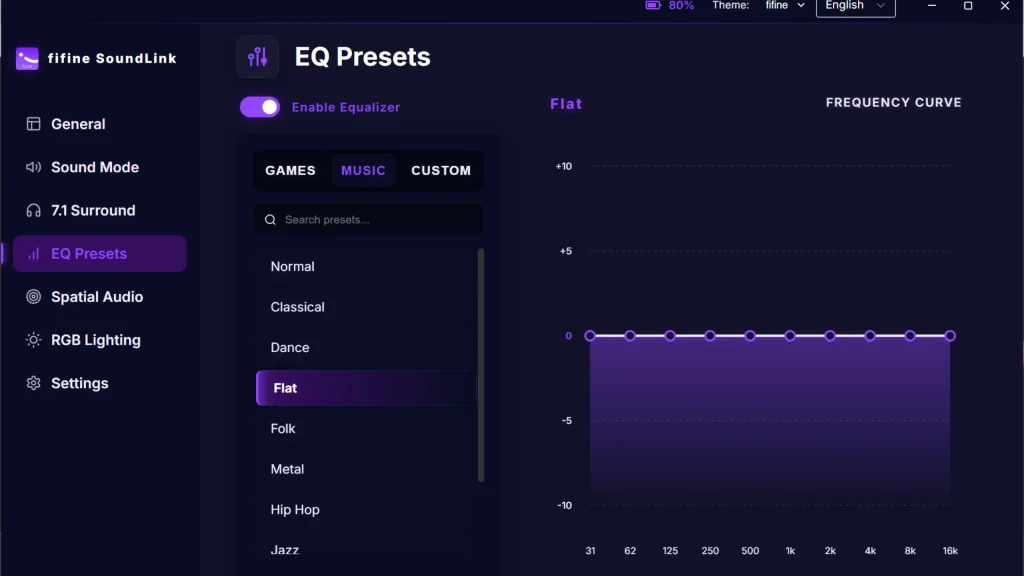
Push a point above 0 dB, and you boost that range. Pull it below, and you reduce it. Leave it at 0 dB, and the EQ doesn’t touch it. That makes a flat line your “do nothing” setting.
What Does Each Frequency Range Do?
| Frequency range | Common audible effect | When to consider adjusting it |
|---|---|---|
| 20–60 Hz | Deep sub-bass, rumble | Add depth or reduce unwanted rumble |
| 60–150 Hz | Bass weight and punch | Make bass fuller or tighter |
| 150–500 Hz | Warmth, body, muddiness | Reduce boominess or add fullness |
| 500 Hz–2 kHz | Midrange body and tone | Address boxiness or nasal sound |
| 2–5 kHz | Presence and intelligibility | Improve vocal or detail clarity |
| 5–10 kHz | Brightness, consonants, sibilance | Add definition or reduce harshness |
| 10–20 kHz | Air and high-frequency detail | Add openness or tame excessive brightness |
The ranges overlap, and what you hear depends on the source and your gear. Boxiness on one voice might sit around 400–800 Hz, while on another it’s lower. And if your speakers can’t reproduce sub-bass, boosting it won’t do much.
What Are Frequency, Gain, and Q?
Now that you know where to look, let’s talk about how to make the move. Most EQs give you three controls:
- Frequency: where the adjustment happens.
- Gain: how much you boost or cut.
- Q (bandwidth or resonance): how wide or narrow the adjustment is. A low Q affects a broad range; a high Q targets a thin slice.
You’ll also choose a filter shape:
- Bell: a hump or dip around one frequency. Your everyday tool.
- Low shelf / high shelf: raises or lowers everything below (or above) a point, like a step.
- High-pass (low cut): lets the highs through and removes the lows. Great for rumble.
- Low-pass (high-cut): the opposite. Removes the highs and keeps the lows.
The trick? Each filter is named for what it keeps.
How to Set EQ Settings Step by Step
After learning what EQ is in audio, let’s see how to set up the EQ for your audio with the EQ curve. Whether it’s low rumble, a boxy sound tone, or noticeable mouth noise, here’s how a methodical EQ pass handles each one.
Step 1 — Start With a Flat EQ Curve
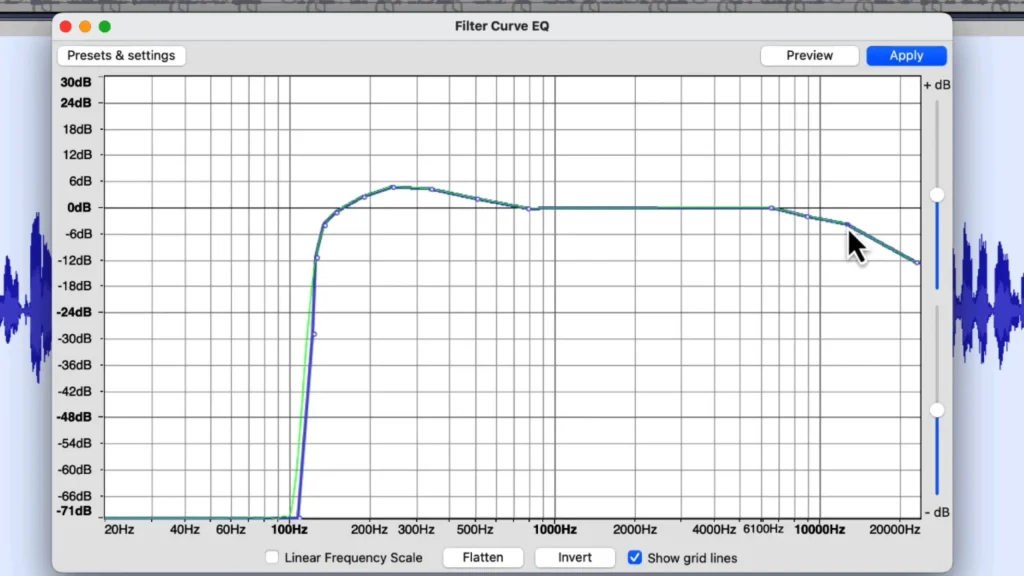
Reset the EQ, or set every point to 0 dB. A leftover curve from a previous session can hide what’s actually wrong with your audio. It’s easy to miss, too: in the Learn Audacity tutorial by @AudacityTraining, Mike opens Filter Curve EQ and finds his last curve still loaded, with no label showing which preset it was. So he flattens it before doing anything else.
Next, pick your test audio:
- For music playback: a song you know well, ideally one with clear vocals, solid bass and cymbals.
- For a recording: a 20- to 30-second section that represents the whole file, not just the quietest bit.
- In a DAW: loop that section so you hear the exact same passage after every change.
Set a comfortable volume and leave it there. Then name one specific problem. “The bass is too boomy” gives you somewhere to start. “The sound quality is bad” doesn’t.
Step 2 — Identify the Frequency Range That Needs Attention
Match what you hear to where it likely lives, for example:
| What you hear | Where to look first | Typical first move |
|---|---|---|
| Rumble, hum, room noise | Below about 100 Hz | High-pass filter |
| Electrical hum | 60 Hz in North America, 50 Hz in most other countries | Narrow notch |
| Weak bass | Roughly 60–150 Hz | Gentle bell or low-shelf boost |
| Boomy or muddy | Roughly 150–500 Hz | Small cut |
| Boxy or nasal | Roughly 200–800 Hz for voices | Narrow cut found by sweeping |
| Unclear vocals | Roughly 1–5 kHz | Small, wide boost |
| Harsh or sibilant | Roughly 3–10 kHz (sibilance often falls between 4 and 10 kHz) | Narrow cut |
| Dull or closed-in | 8 kHz and up | Gentle high shelf |
These are starting points, not guaranteed fixes. Work on the smallest range that addresses the problem.
Step 3 — Adjust the EQ Curve Gradually
- Select a frequency point near the problem area.
- Move it slightly up or down.
- Listen to the same passage again.
- Widen or narrow the adjustment if your software allows it.
- Repeat only if necessary.
Start with changes of about 1–2 dB and go further only when the result calls for it. Bigger moves have their place for creative effects or stubborn problems.
“Gradually” matters. Remove some of the hum first. Then nudge the corner up toward 100 Hz, preview, and push a little further. A clean recording still beats a heavy fix.
Step 4 — Cut Unwanted Frequencies Before Adding More Boost
Cleaning up usually sounds more natural than piling on boosts. Clean before you color.
- Instead of cranking the treble to make muddy audio clearer, try a subtle cut in the low mids first.
- Instead of boosting every bass point, decide what you actually want: deep sub-bass, punch, or warmth. Each lives in a different range.
Step 5 — Compare the EQ-On and EQ-Off Sound
- Play the same passage at a similar perceived loudness.
- Toggle the EQ on and off.
- Listen for the improvement you wanted, and for any new problems.
- Check more than one song or recording.
Watch out for the loudness trap. Every boost raises the volume at those frequencies. As @TheBandGuide, one vocal mixer, points out, when you toggle the EQ, you might prefer the processed version simply because it’s louder. After his presence and air boosts, he turns the EQ’s output gain down a little so the comparison stays fair. If you’ve mostly cut, you may need to add a little gain back instead.
Step 6 — Check Output Level and Save Your Settings
- Watch for clipping or distortion after boosts.
- Lower the output or preamp gain when needed.
- Save the curve with a descriptive name, like “Studio headphones – less mud.”
- Recheck the result on the headphones or speakers you’ll actually use.
Best EQ Settings for Different Sound Goals
Now let’s check out the best EQ settings for different sound goals. Take notice that they’re not universal presets. Adjust every one by ear, and keep boosts small unless you have a clear reason not to.
Best EQ Settings for Bass
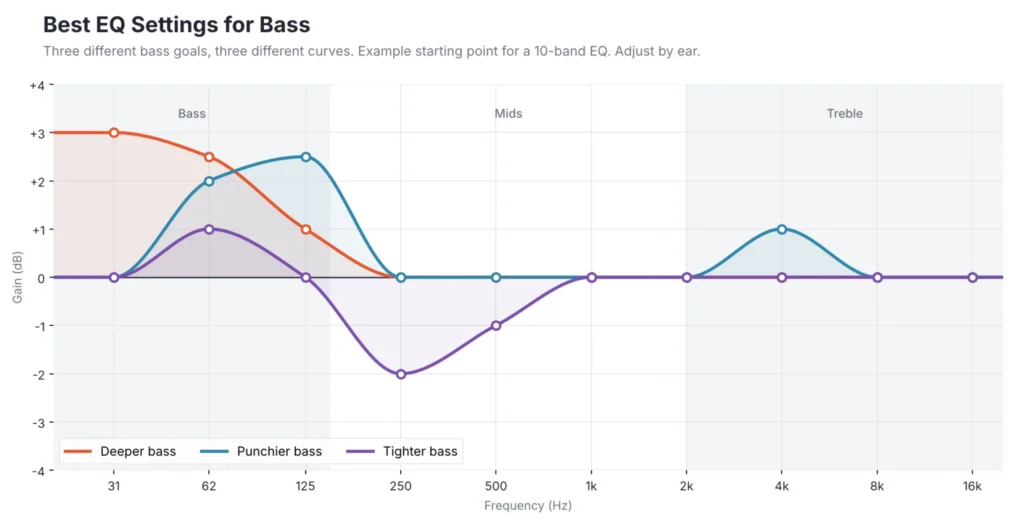
“More bass” can mean three different things, and each lives in a different place:
- Deeper bass lifts the sub-bass. Skip it on small speakers or earbuds that can’t reproduce 31 Hz; they’ll distort first.
- Punchier bass lifts the upper bass and adds a touch at 4 kHz, where the click of a kick drum lives.
- Tighter bass cuts the low mids that make bass sound boomy.
One note: Avoid distortion. Don’t force small speakers to play deep bass with extreme sub-bass boosts. They’ll distort before they deliver.
Best EQ Settings for Clear and Warm Vocals
Mostly, the clear and warm curve adds body to voices and a little presence and air on top. Take this EQ setting:
Recording your own voice instead? Swap the low-end boosts for these moves:
- High-pass filter: raise it until the voice starts to thin out, then back off slightly. For most voices, that’s about 80–150 Hz, lower for deep voices.
- Low-mid cut: sweep 200–800 Hz for the boxy spot and dip it slightly.
- Presence: a gentle 1–4 kHz boost helps words cut through.
- Highs: go easy. Too much top end exaggerates “s” sounds and mouth noise.
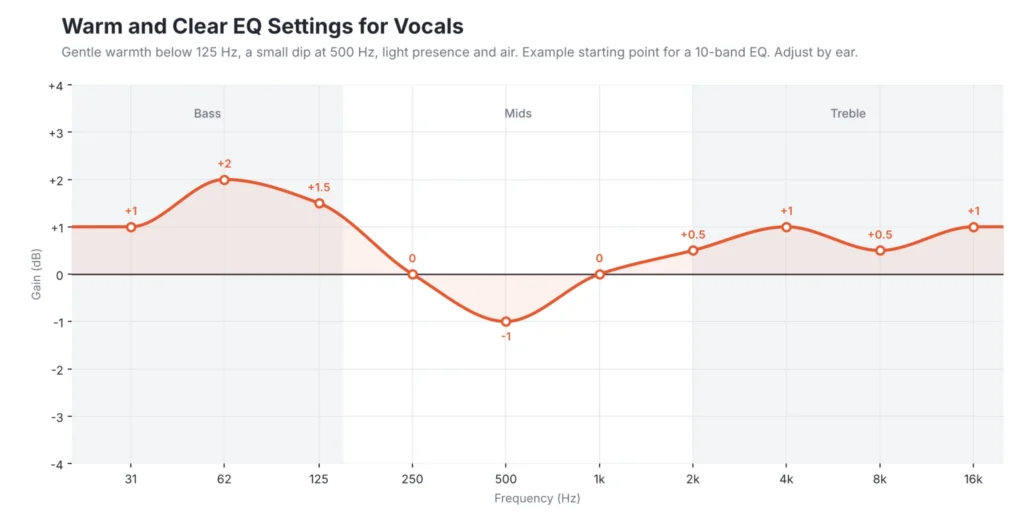
One note: EQing a microphone recording and EQing music playback share principles, but they’re different jobs. A vocal EQ shapes one source; playback EQ shapes the entire finished mix.
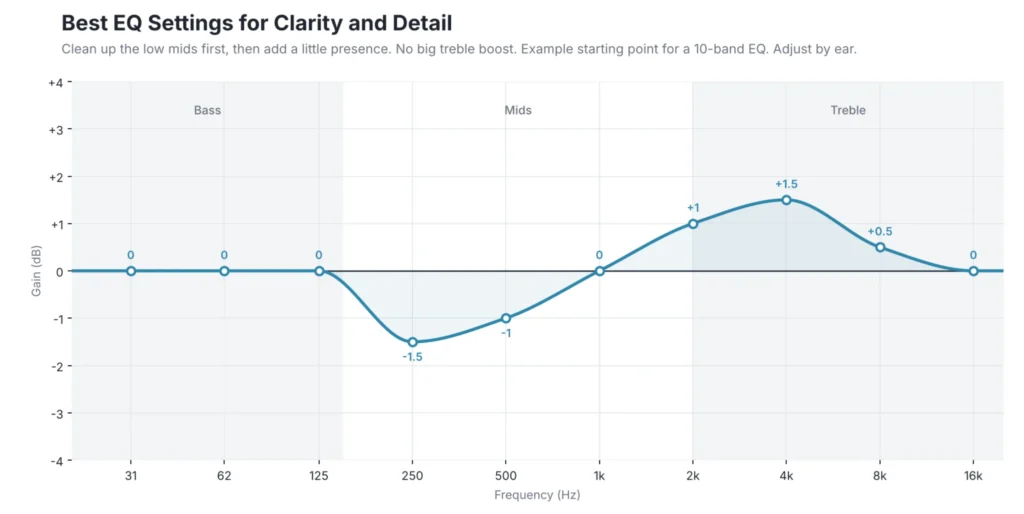
Best EQ Settings for Clarity and Detail
Clarity and brightness aren’t the same thing. Brightness is more treble. Clarity is hearing each part of the sound distinctly.
For real clarity:
- Reduce masking first. Remember the synth-and-vocal example from Step 4: cutting the competing part brought the vocal forward without boosting it.
- Clean up the low mids. Muddiness around 200–500 Hz blurs detail more than missing treble does.
- Add presence only if the source needs it, using a small, wide boost somewhere between 2 and 5 kHz.
- Avoid big treble boosts that make cymbals, consonants and background noise fatiguing.
Best EQ Settings for a Smooth, Less Harsh Sound
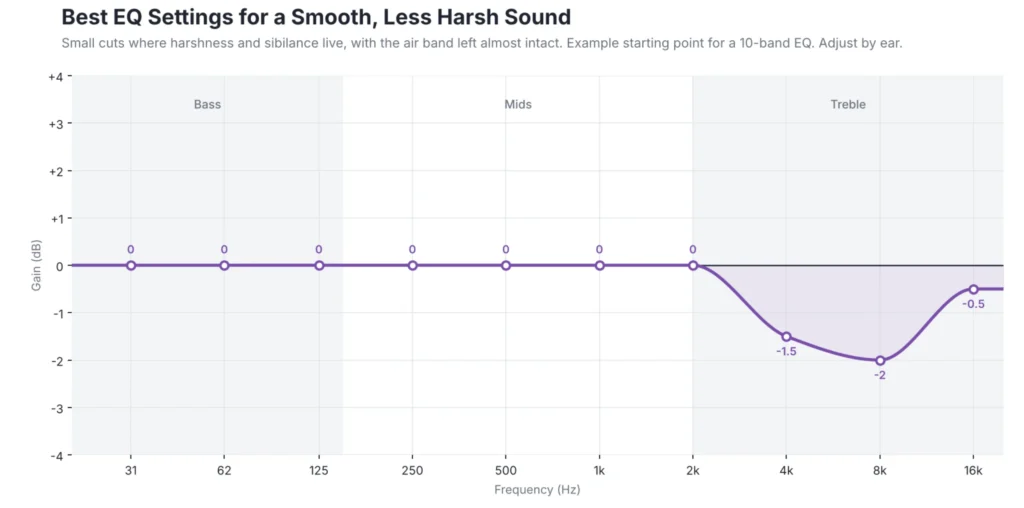
Harshness usually sits in a narrow spot, not across the entire top end. To tame harshness:
- Sweep the upper midrange and treble (roughly 2–10 kHz) with a narrow band to find the spot.
- Apply a small, narrow cut there before reaching for a big, broad one.
- For sibilance, which often falls between 4 and 10 kHz, try a narrow cut. If it only bites on certain words, a de-esser handles it better because it reacts only when “s” sounds hit.
- Protect clarity. Adams demonstrates over-cutting by dropping 10 kHz by almost 30 dB. The noise goes down, but so does the life of the voice.
Best EQ Settings for Gaming, Podcasts, and Everyday Listening
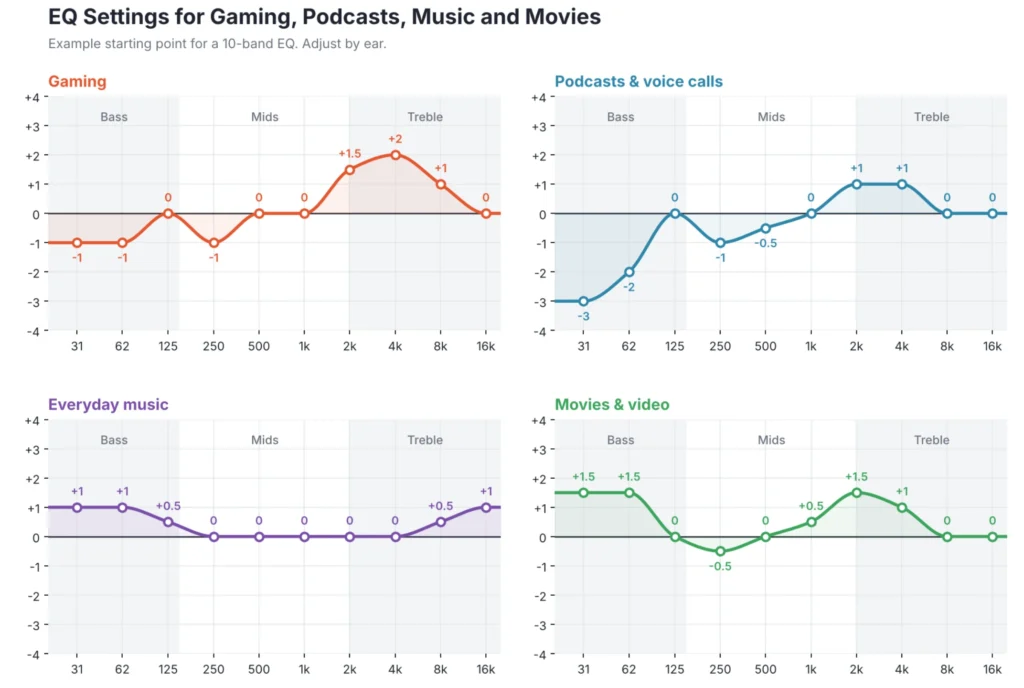
- Gaming: Prioritize clear chat and useful cues like footsteps. Results vary by game, headset and personal taste, which is why game-specific presets exist in software such as fifine Genie software. Treat them as starting points, then tune by ear.
- Podcasts and voice calls: Aim for intelligibility, a natural tone and less rumble. Don’t overdo the narrowing: Audacity’s Telephone preset keeps roughly 300–3,000 Hz and sounds exactly like a phone call, clear but thin.
- Everyday music: Start with tonal balance, then adjust for preference and equipment.
- Movies and video: Balance dialogue clarity with bass impact, so explosions don’t bury speech.
How to Adjust EQ Settings in Different Software
The principles stay the same everywhere. But the controls change. Let’s see where you can adjust the EQ settings.
Adjust EQ Curves in fifine Genie software
fifine Genie software supports custom control for microphones, headsets, and audio mixers. In the fifine Genie, you can adjust the EQ curve for various devices. Using the fifine SC8 audio mixer as an example. Once you connect the SC8 mixer, you can pick a preset from the drop-down menu, or work from flat.
As with any curve editor, the 10 nodes shape one smooth curve. They aren’t necessarily 10 independent bands, so moving one node can change the shape around its neighbors.
Check our guide to learn more about how to use fifine Genie.
Adjust EQ Settings in Audacity
Audacity’s Filter Curve EQ lets you draw a curve on a frequency-against-gain graph and place control points wherever you need them.
- Select the audio to process.
- Open Effect > EQ and filters > Filter Curve EQ.
- Reset the curve to flat.
- Click the line to add control points, then drag them.
- Click Preview and compare with the original.
- Check the meters for clipping, especially after low-frequency boosts.
Filter Curve EQ is destructive once you apply and save. Duplicate the track first, so you keep an untouched copy. If you use the same mic in the same room, save your curve as a preset named after the mic.
Want to know more? Check our beginner guide on how to use Audacity.
Set EQ Settings in Ableton Live
Ableton’s EQ Eight is a parametric EQ with frequency, gain and Q controls, plus several filter shapes.
- Insert EQ Eight on the track.
- Select a filter point.
- Adjust frequency, gain and Q.
- Toggle the device on and off to compare.
- Check the output level and adjust gain if you’ve boosted a lot.
Example: on a piano that clashes with a bass line, a high-pass filter removes the piano’s low end and gives the bass room.
Conclusion: Find the Best EQ Settings for Your Sound
The best EQ settings aren’t a number you copy but a habit you build. Start by connecting what you hear to where it lives. Then adjust on purpose. The curves in this guide give you a head start, but your own headphones, speakers, and recordings are the final judge.
So the next time something sounds off, you’ll know how to set EQ the simple way: start flat, fix one thing, and listen.
FAQs
What Are the Best EQ Settings for Better Sound Quality?
The best EQ settings fix a specific problem on your specific gear. Start flat, identify what sounds wrong (weak bass, muddy mids or harsh highs) and make small adjustments in that range. Then compare with the EQ off at matched loudness.
How Do I Set EQ for Beginners?
Reset the EQ to flat, play audio you know well, and name one problem. Find its likely frequency range, move a nearby point by 1–2 dB, and listen again. Toggle the EQ on and off to confirm the change helps, then save the setting.
Should I Boost or Cut Frequencies When Adjusting EQ?
Cut first in most cases. Removing a muddy or harsh range usually sounds more natural than boosting everything around it, and it lowers the risk of clipping. Boosts still have their place, especially gentle ones for presence, air or warmth.
How Much Should I Adjust an EQ Curve?
Start with 1–2 dB and increase only if you still hear the problem. Narrow cuts can go deeper than broad boosts. If a move needs more than a few dB, recheck the source; the problem may be the recording, mic placement or room rather than the EQ.
Can EQ Make Cheap Headphones Sound Better?
Often, yes, within limits. EQ can tame harsh treble, reduce boomy bass or add a little warmth. It can’t add bass the drivers physically can’t reproduce, and heavy boosts can cause distortion.
