
9 Tips for Audio Enhancement: How to Make Your Mic Sound Better
Audio enhancement is the set of habits and tools that turn a raw microphone signal into something people enjoy listening to. Usually, you’ll meet two halves: physical and software treatment. Once you get them right, your mic will not sound rough easily. Here, you’ll know how to make your microphone sound better with 9 easy tips. No more complex equipment and techniques. Let’s get into it.
Quick Tips at a Glance
- Tip #1 – Use a directional mic, and talk into the right side. Point the front at your mouth and the back at your nose.
- Tip #2 – Get close and off-axis. Three to six inches, angled slightly past your lips.
- Tip #3 – Set your gain with headroom. Aim for around -18 dB and never touch 0.
- Tip #4 – Kill plosives at the source. Angle the mic and add a cheap pop filter.
- Tip #5 – Treat your room. Cut both background noise and reverb.
- Tip #6 – Gate the silence. Stop the room hum and fans from leaking.
- Tip #7 – Shape your tone with EQ. Cut the mud, lift the presence and air.
- Tip #8 – Even it out with compression and a limiter. Consistent volume, no clipping.
- Tip #9 (bonus) – Add a touch of reverb or delay. Space and depth are used sparingly.
Tip 1: Use a Directional Mic, the Right Way
Your microphone’s polar pattern can influence the best pickup position. A directional microphone, cardioid, supercardioid, or hypercardioid, is most sensitive on one side and much less sensitive on the other. That single property is your best free tool for rejecting noise. The catch is that it only works if you talk into the correct side.
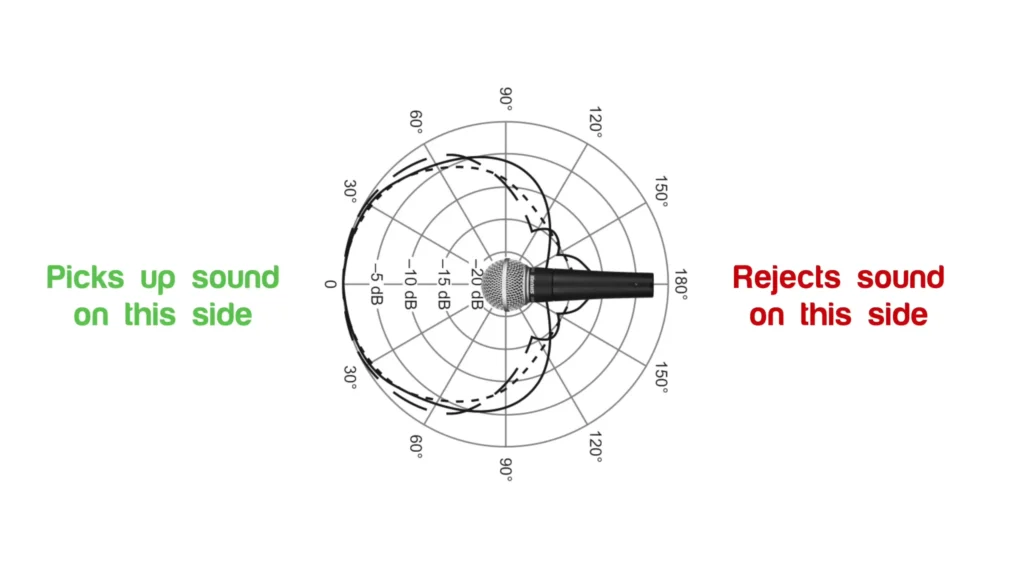
Aim the front of the capsule at your mouth. On side-address mics like the FIFINE AM8 cardioid microphone, speaking into the front grille, not the top. The cardioid polar pattern captures the sound on the front while rejecting the noise from the back.
Pro tips:
- Turn the back of the mic toward your loudest noise source. One creator points the rejecting side of his mic at a fan-cooled light so the capsule barely hears it.
- Cardioid is the safe default for solo recording. Save the other patterns for interviews or specific setups.
Once your mic is facing the right way, the next win is distance.
Tip 2: Get Close and Go Off-Axis
Your microphone placement decides how much of you the mic hears versus how much of your room it hears. Sit too far back, and you’ll crank the gain, pulling in reverb and noise. Sit too close, and you’ll catch breathing and mouth clicks.
Aim for roughly 3 to 6 inches (about 10 centimeters) between your mouth and the capsule. A handy gauge is four to eight fingers of width. Then angle the mic slightly so you’re speaking past it rather than straight into it.
| Distance | What you get |
|---|---|
| Too close (under 3 in) | Breathing, salivating, harsh plosives |
| Sweet spot (3–6 in / ~10 cm) | Full, present, low-end-rich voice |
| Too far (over 8 in) | Thin tone, more room noise and reverb |
Pro tips:
- Record a 20-second test and listen on headphones before you commit. Your ears are the real meter.
- Going off-axis does double duty: it softens plosives and keeps the mic from blocking your face on camera.
- A boom arm lifts the mic off the desk, away from keyboard and mouse clicks, and lets you nail that close, angled position.
- Consider the microphone proximity effect. The closer you get to a directional mic, the more low-end it picks up. You can be closer to your mic for warmth sound or slightly farther for a thinner and brighter tone.
Tip 3: Set Your Gain With Room to Spare
Gain vs volume? Do they work the same in a microphone? Absolutely not. Gain controls the audio signal, while volume decides how much of that signal reaches your ears.
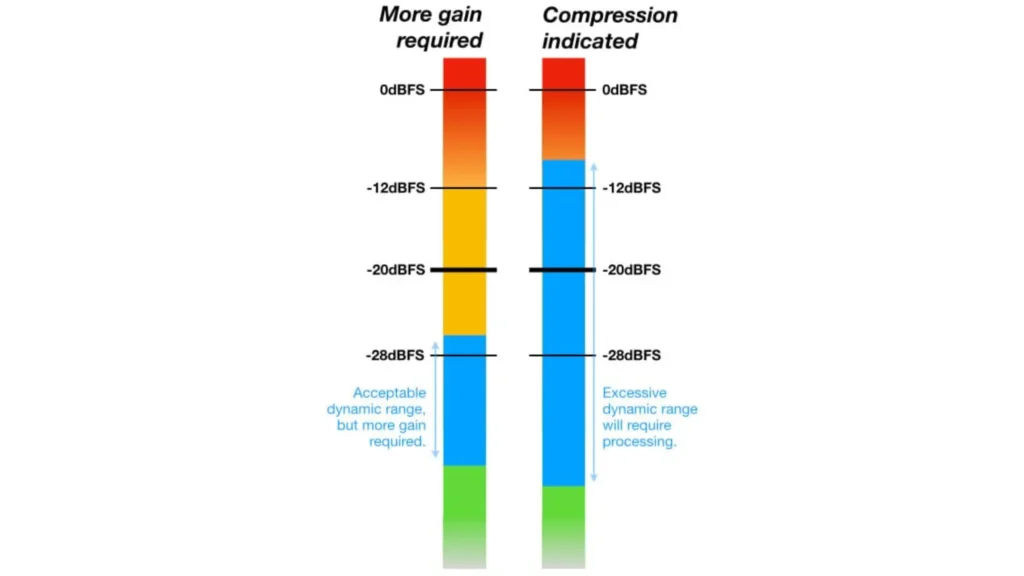
Gain that’s too low forces you to amplify later, which amplifies noise with it. Gain that’s too high clips and distorts, and there’s no fixing that in post. For better audio enhancement, the goal is a strong, clean signal with breathing room at the top, called headroom.
| Scenario | Target peak level |
|---|---|
| Recording you’ll process later | around -18 dB |
| Recording with no post-processing | -12 to -10 dB |
| Live streaming in OBS | around -15 dB |
Pro tips:
- Use the loudest thing you plan to say to set the level, not your quiet voice.
- If you stream, watch the OBS mixer and keep your speaking peaks in the yellow.
- Leave headroom even when you’re confident. Excitement makes you louder than you think.
Tip 4: Defeat Plosives
Plosives are the bursts of air from P and B sounds that slam the capsule and create an ugly thump. Take a classic stress test with “Peter Piper picked a peck of purple pickled peppers”. If your mic is untreated, it’s painful to hear.
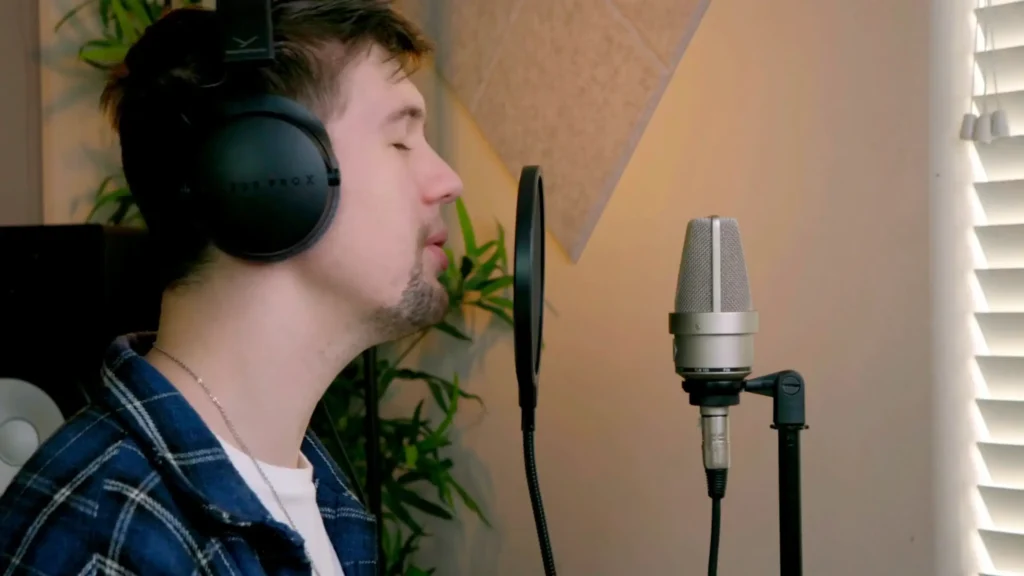
A sweet spot: Move the mic off to the side about 45 degrees while still aiming it at your mouth. That redirects the puff of air past the capsule instead of into it.
Pro tips:
- Positioning first, gear second. Off-axis placement solves most plosives on its own.
- A pop filter or foam windscreen disperses the air blast and costs around $6 to $7. It’s the cheapest upgrade with an audible payoff.
Now that your signal is clean at the source, let’s deal with everything happening around you.
Tip 5: Treat Your Room
Audio enhancement in microphones sometimes just needs to avoid the ambient noise and reverb. Reverb is your voice bouncing off hard walls, floors, and ceilings and arriving back at the mic. Newbies call it echo, but technically, echo is something else; this is reverb, and it makes you sound distant and muddy.
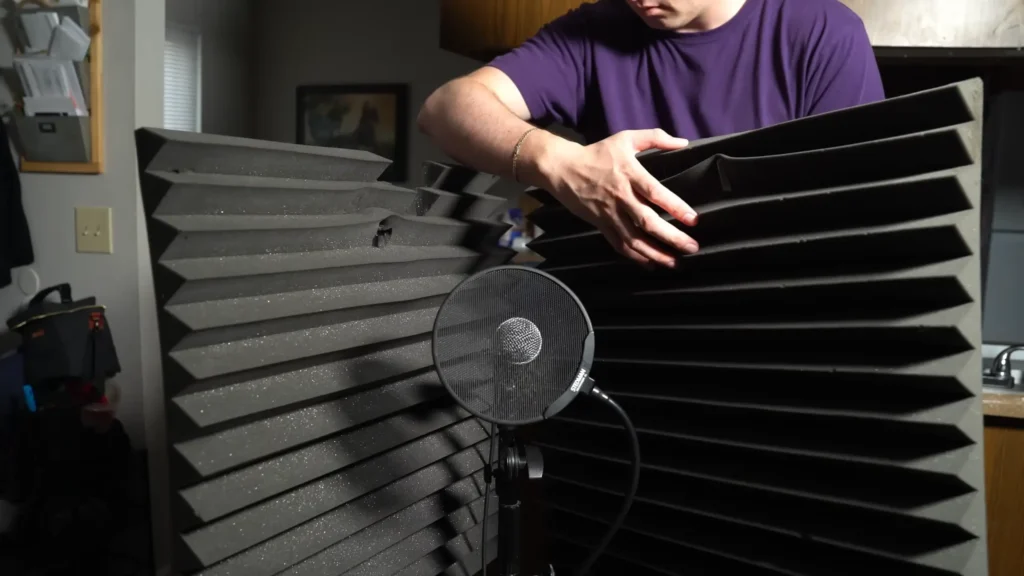
How to reduce the noise when recording? First, silence what you can, fans, AC, anything that doesn’t need to run during the take. Turn it back on the second you’re done. Then soften the hard surfaces around you so they absorb sound instead of reflecting it.
Pro tips:
- Can’t turn off a noise source like a computer fan? Use your mic’s directionality and point the dead side at it.
- Drape blankets over large flat surfaces. A purpose-made sound blanket works best, but even a blanket over a ladder helps.
- Record in a space that’s already soft. Carpets, couches, and beds soak up reflections and make any mic sound crisper. It’s a classic and budget method that records in your closet.
Tip 6: Gate Out the Background
Even in a treated room, faint hum and fan noise leak through when you stop talking. A noise gate, or better, an expander, mutes that signal during your pauses so listeners get clean silence instead of a constant hiss.
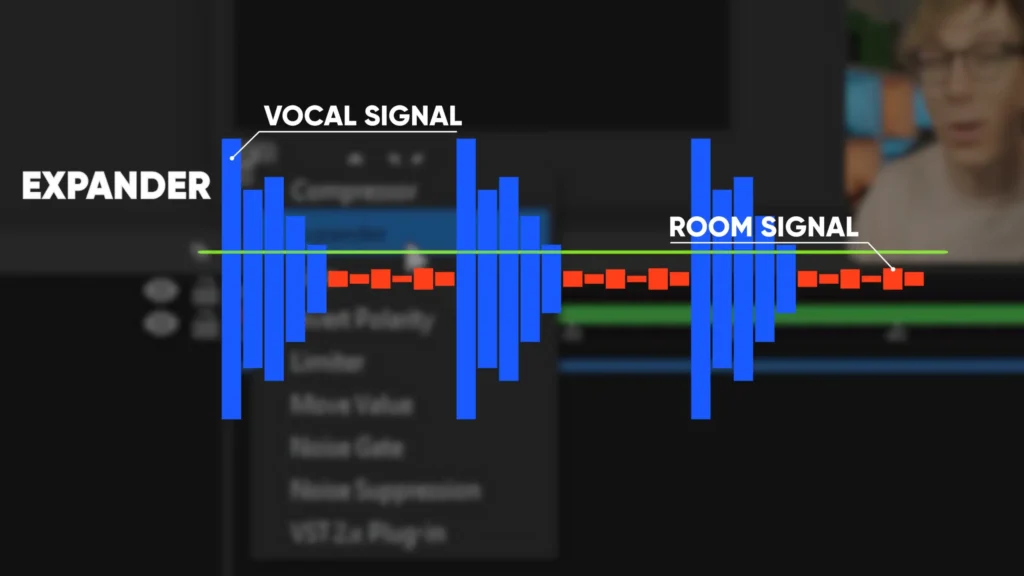
Setting an expander filter for your mic in OBS will make audio enhancement work. An expander works like a gate, but with an adjustable ratio, so it fades quiet sounds down smoothly instead of slamming shut.
Pro tips:
- Find your noise floor first. Mute yourself, watch the meter, and note where the background sits, say -58 dB.
- Set your threshold about 5 dB above that floor. If noise still leaks, raise it; if it chops your words, lower it.
- A ratio around 4:1 sounds more natural than the default 10:1, which behaves like a hard on/off switch.
With the silence handled, you can start shaping the parts where you are talking. EQ is next.
Tip 7: Sculpt Your Voice With EQ
EQ boosts the frequencies that make your voice clear and pleasant while cutting the ones that add mud or harshness. It’s the difference between a voice that sits up front and one that sounds like it’s stuck in a box.
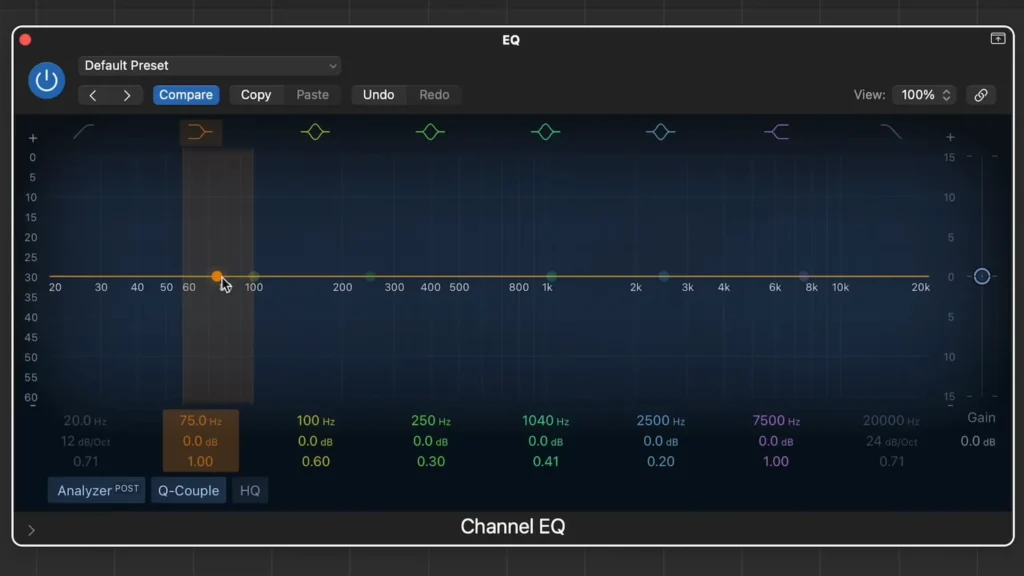
Add an equalizer to your effects chain (in OBS, the free ReaPlugs ReaEQ does this well). Here’s the ideal setup:
| Frequency range | Move | Why |
|---|---|---|
| Below 80–100 Hz | High-pass/cut | Removes rumble and low-end mud |
| 100–200 Hz | Slight boost (~1 dB) | Adds warmth, body, and presence |
| ~300–1,000 Hz | Slight cut | Reduces boxy, muddy midrange |
| ~480–500 Hz | Cut 1–2 dB | Kills the “talking in a box” tone |
| 2,000–5,000 Hz | Slight boost | Adds clarity, brightness, and crisp S sounds |
| Above 18 kHz | Low-pass/cut | Trims hiss and noise outside your voice |
Pro tips:
- Your mic, voice, and room are unique, so trust your ears over the numbers.
- Cut before you boost. Removing problems usually beats piling on highs and lows.
- Keep your bandwidths fairly narrow on cuts, so you’re only touching the problem frequency.
EQ fixes tone, but it won’t fix wildly uneven volume. That’s compression’s job.
Tip 8: Balance Everything With Compression and a Limiter
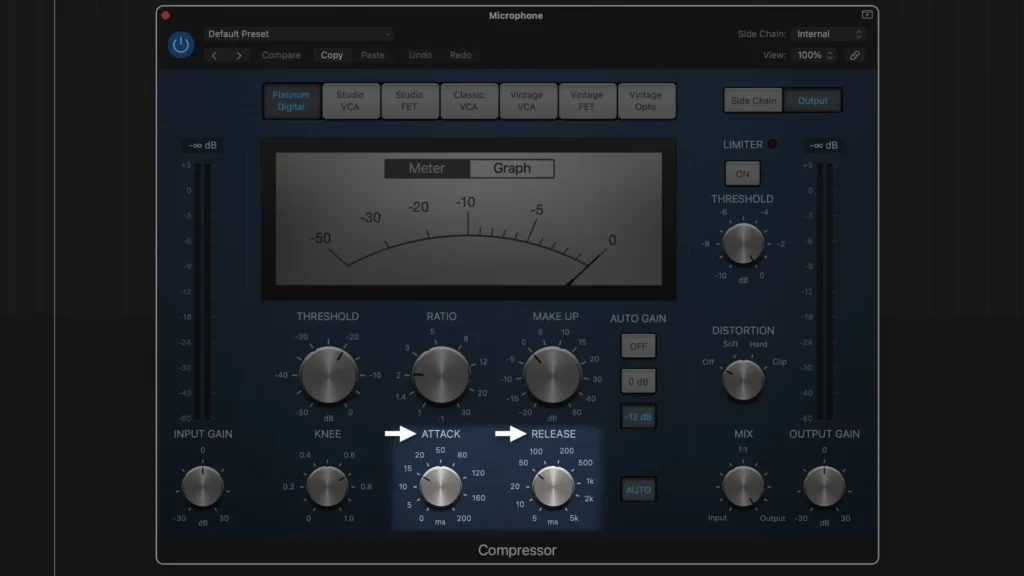
Compression controls dynamic range. It quiets your loudest moments and lifts your quietest ones, so your volume stays consistent, no deafening your audience when you get excited, no leaning in to hear your soft asides.
Add a compressor near the end of your chain. The core controls are threshold (where it kicks in), ratio (how hard it squeezes), and attack and release (how fast it reacts). Start with a threshold around -18 dB and a gentle ratio.
Pro tips:
- A ratio around 4:1 keeps things natural. Heavier ratios like 8:1 or 10:1 can sound robotic.
- After compressing, add a few decibels of output gain (start around 3 dB) to bring your level back up into range.
- Finish with a limiter as the very last filter, threshold near -1 dB. It’s a safety net that stops you from clipping when you scream after a big moment.
Tip 9 (Bonus): Add Space With Reverb and Delay
A bone-dry vocal can feel flat. A whisper of reverb or delay adds depth and makes your voice sound like it lives in a real space rather than a vacuum.
So, add a reverb plugin and lean on presets, which are tuned for specific spaces, and make a fast starting point. A subtle delay can add dimension too.
Pro tips:
- Less is more. Too much reverb pushes your voice back and muddies your clarity. Keep it subtle so you still sound upfront.
- For spoken word, you often want almost none. Save the bigger effects for music or stylized intros.
Bringing It All Together
Audio enhancement doesn’t need the high cost and the extremely professional techniques. A budget microphone with the purple steps can make your mic sound better. Position, distance, and a quiet, soft room do the heavy lifting. EQ, gating, and compression add the polish.
None of these clicks on the first try, and it’s not supposed to. Start by picking the best microphone for your streaming, gaming, or podcasting. Then record yourself, listen back on headphones, change one thing, and listen again. Even a single one moves you forward.
FAQ
What’s the single most impactful change I can make right now?
Positioning. Get within three to six inches of the mic, speak slightly off-axis, and make sure you’re talking into the correct side. It costs nothing and fixes the most problems at once.
How far should I sit from my microphone?
Around three to six inches, roughly 10 centimeters, or four to eight fingers of width. Too close brings mouth noise; too far brings room reverb. Record a test and trust your ears.
Do I really need a pop filter?
Not always. Angling your mic off-axis solves most plosives. If hard P and B sounds still punch through, a pop filter or windscreen at around $6 to $7 is a cheap, easy fix.
What software do I need for EQ and compression?
Whatever you already use. OBS handles a full live chain for free with the ReaPlugs pack for EQ. Logic Pro and any other DAW have EQ, compression, and reverb built in. Start with presets.
Noise gate or expander, which should I use?
An expander, if your software offers one. It reduces background noise smoothly using an adjustable ratio, while a basic gate slams fully open or shut. Set your threshold about 5 dB above your noise floor.