
How to Stream on Twitch With OBS Studio: From First Stream to Pro Setup
Streaming on Twitch looks complicated — broadcasting software, encoders, bit rates, overlays. Seriously, how to stream on Twitch? With OBS Studio and about an hour of setup, you can run a clean stream that sounds good and doesn’t lag. After following this guide, you’ll have a fully functional setup with multiple scenes, proper audio routing, and optimized video settings. Let’s dive into it.
Step 1: Download and Install OBS Studio
OBS Studio is free, open source, and the industry standard for live broadcasting. If Twitch is responsible for “broadcasting your stream,” then OBS is responsible for “producing your stream.”
Head to obsproject.com, pick your operating system, and install it. On first launch, OBS may run an Auto-Configuration Wizard — select “Optimize for streaming” and let it test your hardware and internet. If it doesn’t appear, find it under Tools > Auto-Configuration Wizard.
Pro tip: Always download from the official site. If you’re choosing between OBS Studio and Streamlabs, go with OBS. Streamlabs might feel easier for beginners, but OBS is where you’ll end up anyway when serious about streaming.
Step 2: Connect OBS to Your Twitch Account
Here, you’ll start your setup for streaming on Twitch. Without this connection, OBS has nowhere to send your stream.
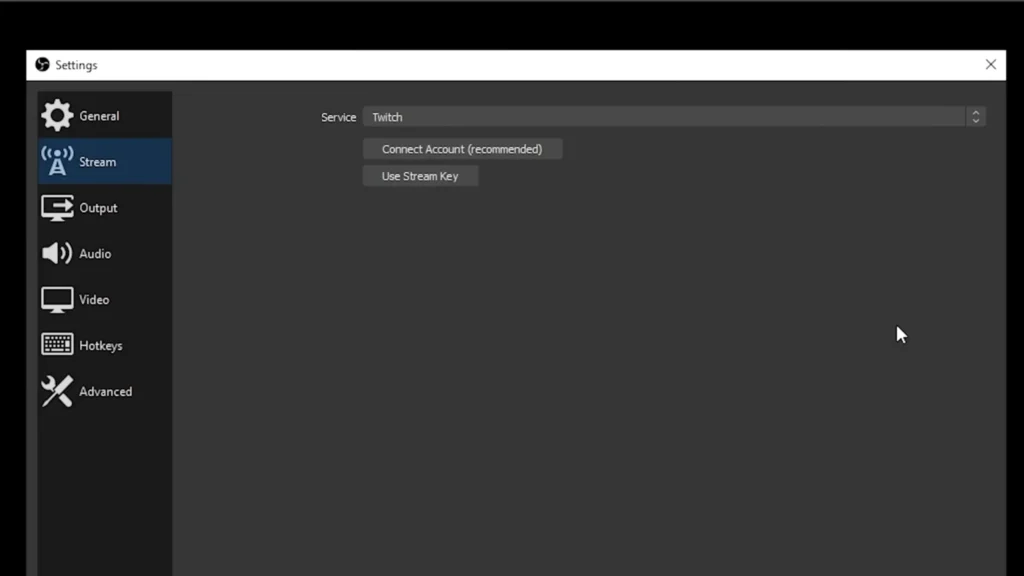
Open OBS and navigate to Settings > Stream. Select Twitch from the Service dropdown, then click Connect Account and log in. After authenticating, OBS pulls in two floating panels: Stream Information (for titles, categories, and tags) and Stream Chat. Drag these into your OBS layout wherever they’re easy to read.
Pro tip: Before your first stream, go to your Twitch Dashboard under Settings > Stream and turn on Store Past Broadcasts. This is off by default — without it, your streams vanish the moment you end them. Reviewing VODs is one of the fastest ways to improve.
Step 3: Understand the OBS Interface
Think of OBS like a live TV control room. Once you understand scenes and sources, you’re directing a show.
Knowing everything in OBS does save you from panicking mid-stream. The large black box at the top is your Preview — exactly what viewers will see. Below it are four key panels:
- Scenes (bottom left) is essentially a “visual container.” You can switch between them as needed, like “Starting Soon,” “Live Gameplay,” and “BRB.”
- Sources (next to Scenes) are the furniture inside each room, like our webcam, game capture, images, and audio.
- Audio Mixer (center) shows volume levels for every audio source in the current scene. The ideal levels are between -10 dB ~ -5 dB. Avoid hitting 0 dB for explosion and clipping.
- Controls (bottom right) houses Settings and, most importantly, the Start Streaming button.

Pro Tips for Sources: Commonly, you can find these Sources in OBS: Display Capture, Game Capture, Video Capture Device, Audio Input Capture, and Image / Text. Source order also matters. Items higher in the list layer on top of items below.
Step 4: Build Your Essential Scenes
Scenes give your stream structure and make transitions between segments polished. Scene switching is about guiding your audience through your content. When done right, viewers won’t notice the transitions. They’ll just stay engaged.
You need three scenes at a minimum:
- Starting Soon — Gives viewers time to trickle in. Right-click your default scene, rename it “Starting Soon,” then click + under Sources and add an Image source. Browse to your graphic (design one in Canva or grab free packs from community sites), then drag the corners to fit your canvas.
- Just Chatting — For talking to your audience. Create a new scene, add your webcam via Video Capture Device, then right-click and use Transform > Fit to Screen.
- Gameplay — Where the action happens. Create another scene and add your game and webcam sources (next step).

Pro tips: For animated overlays, use a Media Source instead of an image. Duplicate your Starting Soon scene for a “Be Right Back” screen — just swap the graphic. Set hotkeys under Settings > Hotkeys to switch scenes with a key press.
Step 5: Add Your Webcam and Game Capture
Setting up your webcam and game capture is about balancing performance, clarity, and viewer experience. A clean layout and stable capture can instantly make your stream look more professional.
Adding your webcam: In your Gameplay scene, click + under Sources and choose Video Capture Device. Select your camera, click OK, then resize and position it in a corner. Hold Alt while dragging an edge to crop the frame tighter.
Adding game capture: Click + and select Game Capture. You have three options in order of preference:
- Game Capture — Lightest on your system. Set it to capture a specific window or any full-screen app.
- Window Capture — Grabs a specific window. Use if Game Capture doesn’t detect your game.
- Display Capture — Captures your entire screen. Last resort — be careful with private info.

Common mistake: If your webcam disappears after adding game capture, check the source order. Drag your webcam above the game capture in the Sources panel so it layers on top.
Step 6: Set Up Your Microphone and Audio Routing
A good setting in your OBS would make your budget microphone, like the FIFINE AM8, sound more personal for streaming. Sometimes you just need some easy mic setups in OBS Studio.
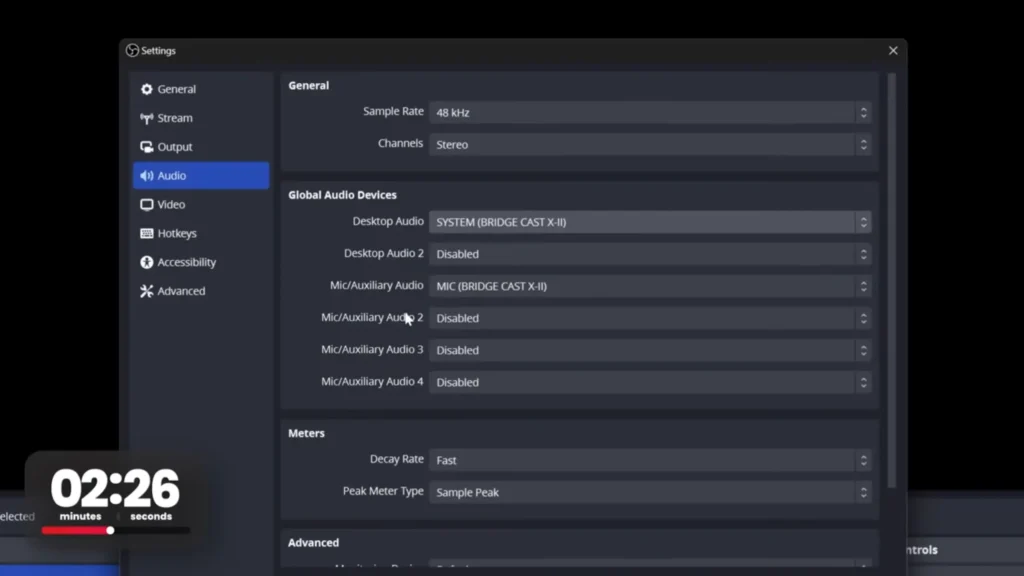
The quick method: Go to Settings > Audio. Under Mic/Auxiliary Audio, select your microphone. Under Desktop Audio, select your default audio output (this captures game sounds, music, and alerts). Set the monitoring device to your headphones to avoid feedback. Click Apply.
The advanced method: OBS supports Application Audio Capture, letting you control each app’s volume independently — no external mixer needed. First, disable both Desktop Audio and Mic/Auxiliary Audio in Settings. Then add sources manually: Audio Input Capture for your mic, and Application Audio Capture for each app (game, Discord, music).
Important: Audio sources built into one scene don’t carry to others automatically. Right-click each audio source, Copy, switch scenes, and Paste Reference so your mic stays active everywhere.
Pro tips:
- Aim for mic levels around -12 dB (yellow zone) and desktop audio around -32 dB.
- Don’t leave your mic on “Default” — OBS might grab your webcam’s built-in mic instead.
- Always use headphones while streaming to prevent echo.
Step 7: Configure Video Resolution and Output Settings
Wrong settings here mean a pixelated, laggy, or unwatchable stream.
Go to Settings > Video:
- Base (Canvas) Resolution — Match this to your monitor (1920×1080 for 1080p, 2560×1440 for 1440p).
- Output (Scaled) Resolution — What gets sent to Twitch. Use 1920×1080 if your PC and internet handle it, or 1280×720 if you experience lag. Most mobile viewers won’t notice the difference.
Tips: If these two resolutions differ, set the Downscale Filter to Lanczos for the sharpest result. Set FPS to 60 for fast-paced games or 30 for slower content.
Step 8: Choose the Right Encoder and Bit Rate
Your encoder and bit rate determine stream sharpness and PC workload.
Go to Settings > Output and switch from Simple to Advanced. Under the Streaming tab:
- Encoder — Pick NVIDIA NVENC H.264 (NVIDIA GPU) or AMD HW H.264 (AMD GPU). Both use a dedicated chip, so your CPU stays free for gaming. If you have neither, use x264 (CPU-based) with the preset set to veryfast.
- Rate Control — Choose CBR (Constant Bit Rate). Set your bit rate based on output resolution:
| Output Resolution | Recommended Bit Rate |
| 1080p 60fps | 6,000 Kbps |
| 720p 60fps | 4,500–6,000 Kbps |
| 720p 30fps | 3,000–4,500 Kbps |
Tips: Twitch soft-caps at 6,000 Kbps. Since 1,000 Kbps = 1 Mbps, you need at least 10–12 Mbps upload to stream at the cap with headroom. Test at speedtest.net before going live.

Step 9: Set Up Alerts and Stream Info
Twitch has a built-in alert system. You can know new followers, subscribers, and donations in time. Go to your Twitch Dashboard > Alerts, click Create Alert Box, and copy the Browser Source URL at the bottom of the page.
In OBS, click + under Sources, add a Browser source, and paste the alert URL. Position it where you want notifications to appear. To use the same alert across all scenes, right-click the source, Copy, then Paste Reference in each scene.
Pro tip: Double-click the alert source and check Control Audio via OBS so it appears in your mixer. Then open Advanced Audio Properties (gear icon next to the alert in the mixer) and set it to Monitor Only (Mute Output). Desktop audio still sends the alert sound to the stream and lets you hear it in your headphones, too.
Step 10: Go Live and Manage Your Stream
Before hitting the button, fill in your Stream Information: set an engaging title, select your game category, and add relevant tags. Then click Start Streaming in the bottom-right Controls panel. You’re live.
During your stream, monitor the status bar at the bottom of OBS — it shows bit rate, dropped frames, and stream health. If frames are dropping, lower your output resolution or bit rate.
When you’re done, click Stop Streaming. Check your Twitch Dashboard’s Stream Manager to review session stats.
Final Tips on How to Stream on Twitch
You now have everything you need for how to stream on Twitch — solid video, proper audio, professional scenes, and optimized settings. The setup is just the starting line. The real skill — being entertaining, engaging chat, building community — only comes from doing it. Start simple and talk, even if nobody’s there yet. Keep showing up and leveling up now.
FAQs
Do I need a powerful PC to stream on Twitch?
Not necessarily. If your GPU supports hardware encoding (NVENC or AMF), the workload stays off your CPU. A mid-range gaming PC handles both fine. If it struggles, drop to 720p 30fps.
Should I use OBS Studio or Streamlabs?
OBS Studio. It’s lighter, more customizable, and doesn’t bundle extras that add bloat for beginners.
What upload speed do I need?
For a 6,000 Kbps stream, aim for at least 10–12 Mbps upload. Test at speedtest.net before going live.
Can I stream without a webcam?
Yes. Plenty of successful streamers go faceless. Audio quality and personality matter more.
Can I use budget microphones like FIFINE AM8 for my livestreams?
Surely. A budget USB mic in the $30–$60 range (like a FIFINE AM8 USB/XLR microphone) delivers clear audio without needing an interface. The dual connectivity also provides flexibility for you. With an easy mic setup in OBS, your mic would offer a clear, natural sound.