Best OBS Settings for Streaming in 2026: Make Your Live Streams Better
You’re ready to start your livestream on OBS Studio. But it looks like a slideshow running through a blender. Sound familiar? That’s for your OBS Studio settings that haven’t been properly configured.
Honestly, the settings in OBS can affect your performance. But what are the best OBS settings for streaming? Here, we figure out a complete guide for you, from what you need to touch to the ones you should leave alone, to get a clean, lag-free stream in 2026.
Step One: Prepare Your Streaming Platforms
A few quick housekeeping items first. Open OBS Studio and head to Settings in the bottom-right corner. If you’re streaming to Twitch, connect your account directly through the Stream tab. This unlocks handy docks like Twitch Chat, stream info, and activity feeds right inside OBS, saving you from juggling browser tabs.
If you’re on Kick, you’ll need to select a custom server and enter your stream key manually. YouTube and Facebook have their own login flows in the same menu.
One more thing: uncheck “Enable Enhanced Broadcasting” and check “Ignore streaming service setting recommendations.” This gives you full manual control over every encoder and quality option. Without this step, OBS may override your custom settings with platform defaults.
Step Two: Video Output Settings (The Big One)
Switch the Output Mode from Simple to Advanced. “Advanced” lets you access the encoder controls that actually determine your stream quality.
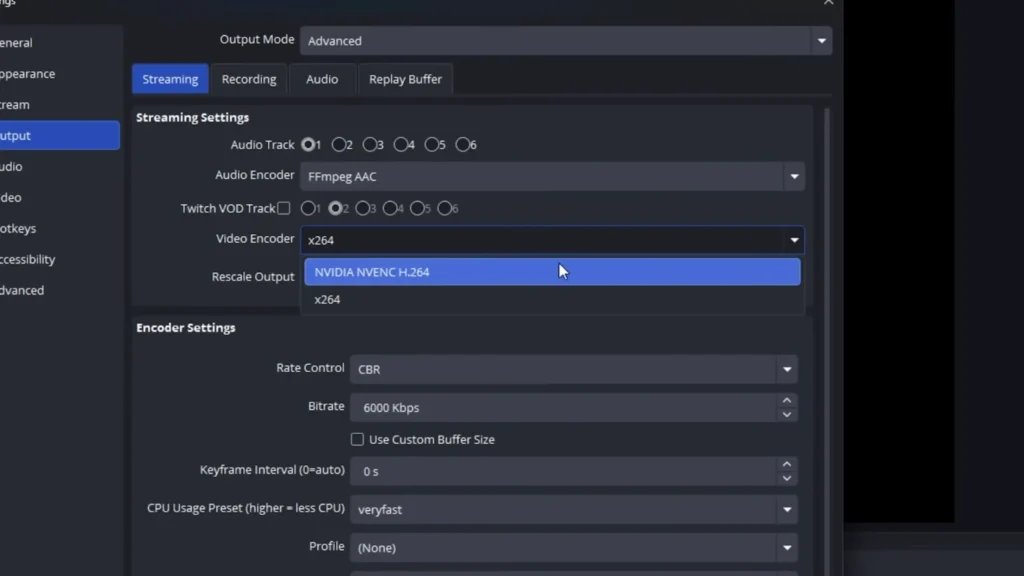
Choosing Your Encoder
As @Hammer Dance puts it, the encoder settings are “where the magic actually does happen” — and he’s right. Your encoder is the engine that compresses your video in real time. Pick the right one:
- NVIDIA GPU: Select NVENC H.264. This offloads encoding to your graphics card, keeping your CPU free for the game.
- AMD GPU: Choose the AMD AV1 or AMF equivalent. Same idea — hardware encoding with minimal CPU overhead.
- No dedicated GPU: Fall back to x264, but be warned — it’s CPU-intensive and can cause performance issues on mid-range machines.
Hardware encoding is the move for almost everyone in 2026. It’s efficient, it’s fast, and the quality gap between NVENC and x264 has narrowed considerably.
Bitrate
Bitrate determines how much data you send per second. Higher bitrate means more detail, but only up to a point. Here’s a quick reference:
- 1080p at 30 fps: 4,500–5,500 kbps
- 1080p at 60 fps: 6,000–8,000 kbps
- 1440p to 4K: 9,000–12,000 kbps (YouTube only)
If you’re streaming on Twitch or Kick, do not exceed 8,000 kbps. Going higher won’t improve quality — it’ll actually backfire. As @Hammer Dance warns, “On Twitch, do not go higher than 8,000 because they will nerf your encoder settings and people will only be able to watch your stream in 720p or lower.” On YouTube, you have more headroom and can set the bitrate to 16,000 kbps for 1080p60 content.
Set rate control to CBR (Constant Bit Rate). This keeps your stream output stable and predictable, which platforms prefer.
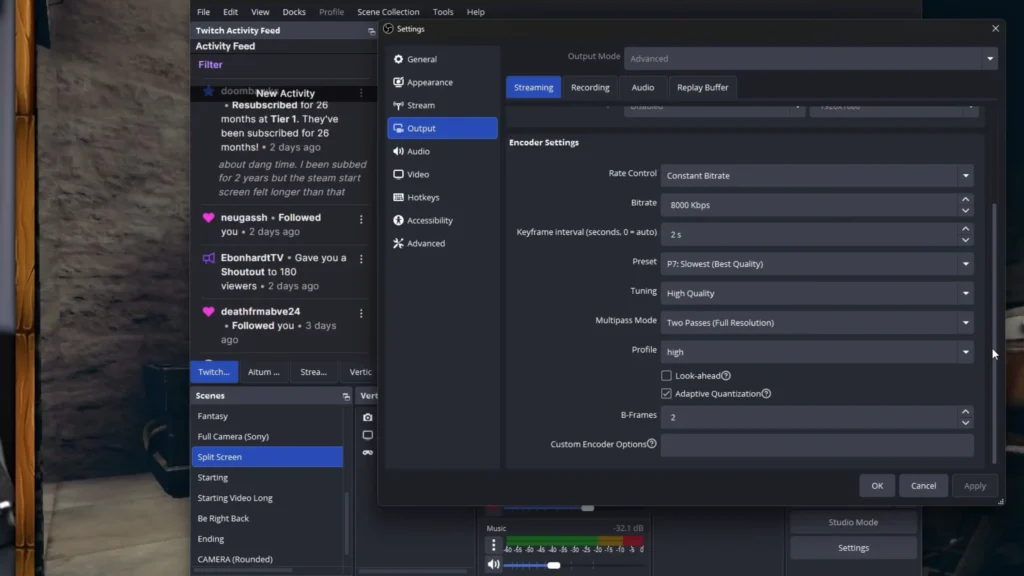
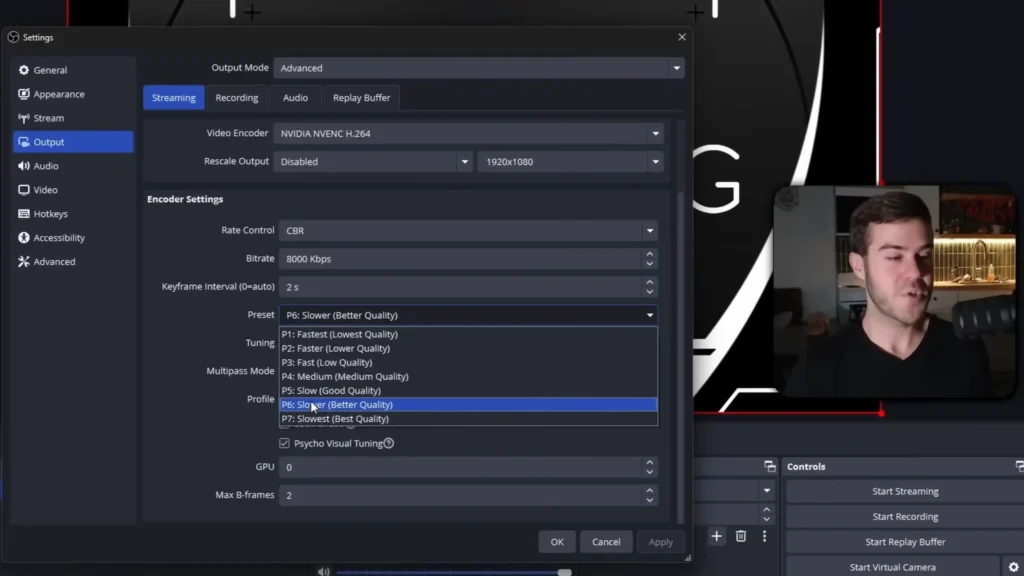
Encoder Preset and Quality Tweaks
The preset slider (P1 through P7) controls how hard your GPU works to compress each frame. Higher numbers mean better compression and image quality, but more GPU load.
- Powerful PC: P6 or P7
- Mid-range PC: P5
- Struggling with dropped frames: Drop to P4, though you’ll start noticing a quality dip
The difference between P5 and P7 is subtle, especially when viewers aren’t watching full screen. If you’re getting encoding overload errors, dropping from P7 to P5 solves it with barely visible impact.
Additional settings to lock in:
- Key frame interval: 2 seconds (standard across all platforms)
- Profile: High
- Max B-frames: 2
- Multipass mode: Two passes (drop to single pass if performance is tight)
- Psycho visual tuning: Enabled
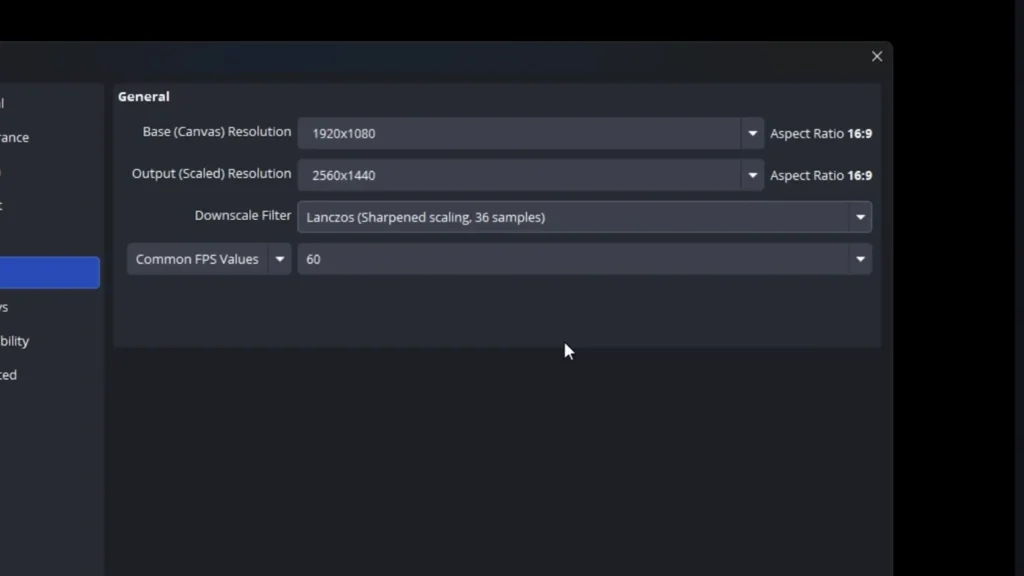
Step Three: Adjust Resolution and Frame Rate
Head to the Video tab in settings. Two fields matter here:
Base (canvas) resolution should match your monitor’s native resolution. If you’re gaming on a 1080p display, set this to 1920×1080. Gaming in 1440p? Set it to 2560×1440.
Output (scaled) resolution is what your viewers actually see. Most streamers on Twitch set this to 1920×1080, even if they game at a higher resolution. If your base and output resolutions differ, OBS will ask you to pick a downscale filter — choose Lanczos for the sharpest result.
Set your FPS to 60. As @oMace puts it, “60 FPS is the move in 2026.” If your hardware can’t maintain it, 30 fps is acceptable, but you’ll want to lower your bitrate accordingly.
Step Four: Set up Audio Settings (Actually Matter)
Bad audio kills streams faster than bad video. @MidnightMan explains, “Audio is probably the most important aspect when it comes to the quality of your content. If that’s not good, it can be close to impossible to retain viewers.” Your viewer won’t tolerate a mic that sounds like it’s recording inside a tin can.
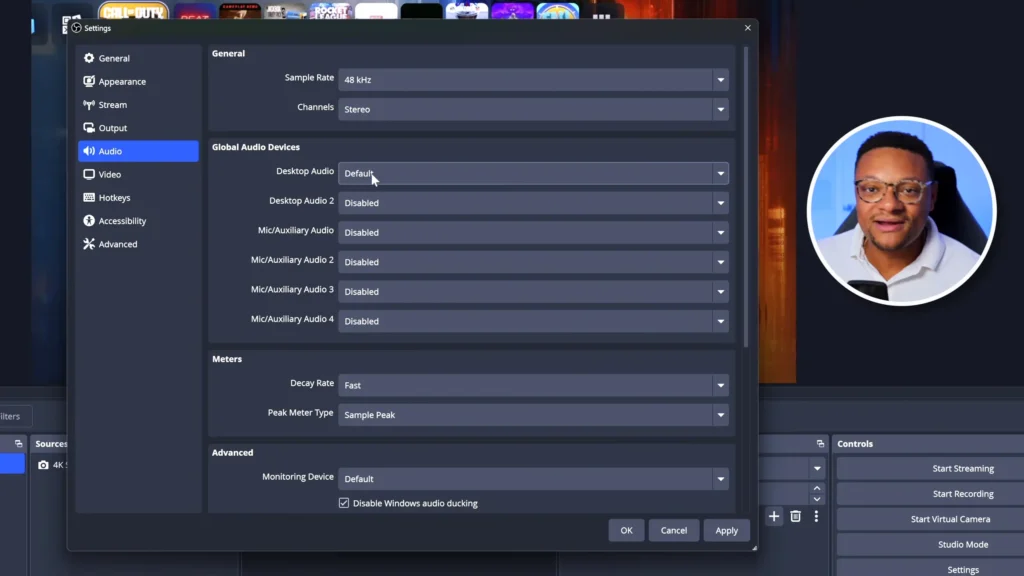
Global Audio Setup
In the Audio tab of settings, set your sample rate to 48 kHz and channels to Stereo. For desktop audio, select the output device you’re listening through (headphones, speakers, audio interface). For mic/auxiliary audio, select your microphone.
A tip worth knowing: disable the default Desktop Audio source if you plan to add application-specific audio captures later. This prevents duplicate audio from bleeding into your stream.
Plus, consider your physical space. Adding soft objects, like carpets and couches, can reduce echo and background noise to some degree.
Audio Levels and Balance
Balancing your audio mix is one of the most overlooked parts of stream setup. Here’s a practical hierarchy:
- Your voice (mic): Loudest. Should peak in the yellow zone of the mixer, never into the red.
- Discord/voice chat: Slightly below your mic level.
- Gameplay audio: Keep this at -25 to -20 dB. It should support the stream, not overpower your commentary.
- Music (Spotify, etc.): The quietest source. Aim for -40 to -35 dB at peak.
You’re the star of the show. Every other audio source sits behind you. Keep your mic about “6 inches to a foot away from your mouth”. Too far, and your audio quality drops noticeably. How about thinking about a mic stand like FIFINE BM88? It lifts your mic off your desk so it doesn’t pick up bumps and vibrations.
Microphone Filters (No Plugins Needed)
Stream with a budget mic like FIFINE AM8, but wanna a better sound? The built-in audio filters in OBS improve your mic sound. Here’s what you should care about.
| Order | Filter | Recommended Settings | What It Does |
| 1 | Noise Suppression | Method: RNNoise | Strips out background hum, fan noise and room tone with minimal CPU hit. |
| 2 | Noise Gate | Close threshold: -43 dB; Open threshold: -38 dB | Mutes your mic when you stop speaking so background noise doesn’t leak through during pauses. |
| 3 | Three-Band EQ | High: +2; Mid: 0; Low: +2 | Shapes the tone of your voice, adding fullness and presence without sounding artificial. |
| 4 | Compressor | Threshold: -18 dB; Ratio: 3:1; Output gain: 3–6 dB | Evens out dynamic range so quiet speech is audible and loud moments don’t clip. |
| 5 | Limiter | Threshold: -3 to -6 dB | Hard-caps your audio ceiling so nothing ever peaks into distortion. |
These five filters, applied in this exact order, transform a $30 USB mic into something that sounds close to a dedicated podcasting setup.
Advanced Tips in OBS: Improve Your Streaming
The Audio Track Trick Most Streamers Miss
Open Advanced Audio Properties (right-click anywhere in the mixer). You’ll see six audio tracks assigned to each source. By default, every source records to every track.
Here’s where it gets useful: uncheck Spotify from Track 1, then set your Twitch VOD track to Track 1. Now your live stream includes the music, but your archived VOD doesn’t — keeping you clear of copyright strikes. The same approach works for recordings.
Advanced Settings Worth Checking
- Renderer: Direct3D 11
- Color format: NV12 (best performance)
- Color space: 709
- Color range: Full
- Auto-reconnect: Enabled (retries if your stream drops)
- Dynamic bitrate change: Optional. If you don’t have enough resources from your internet, like other people share your network, enable this.
Under General, enable Source Alignment Snapping. It helps you line up overlays and scenes precisely in the preview window — a small quality-of-life improvement that saves real time.
Performance Tips for Smoother Streams
Even with perfect settings, a bloated scene can tank your stream. Keep these habits:
- Use Game Capture instead of Display Capture. It’s lighter on resources and captures the game directly.
- Minimize heavy GIFs and animated overlays. Static images load faster and consume less.
- Preload your graphics. Don’t loop large video files as background elements.
- Enable performance mode in OBS to reduce preview load.
- Set OBS process priority to Above Normal (under Advanced settings) to give it priority over background apps.
Tips: Run a test stream before going fully live. Talk at normal volume, get loud, and check for clipping or lag in the playback. Five-minute test saves hours of frustration.
Final Tips on Best OBS Settings for Streaming
OBS Studio is packed with options, but you don’t need to master every single one to get a great-looking stream. Configure your encoder and audio chain first, test before you go live, and resist the urge to crank every setting to its maximum. A little adjustment can make a big difference. Haven’t you messed with your stream settings in a long time? Open OBS, and start tweaking. Your viewers will notice the difference.
FAQs
What bitrate should I use for Twitch streaming?
For 1080p at 60 fps, set your bitrate between 6,000 and 8,000 kbps. Never exceed 8,000 on Twitch — the platform will throttle your stream quality if you do. For 1080p at 30 fps, 4,500–5,500 kbps works well.
Should I use NVENC or x264?
If you have an NVIDIA GPU, use NVENC H.264. It handles encoding on your graphics card instead of your CPU, which means less performance impact while gaming. x264 produces slightly better compression at the same bitrate, but the CPU cost usually isn’t worth it for live streaming.
What’s the best OBS resolution for streaming?
1920×1080 (1080p) at 60 fps is the sweet spot for most streamers in 2026. If you game at a higher resolution like 1440p, set that as your base canvas and downscale your output to 1080p using the Lanczos filter.
Do I need plugins for good mic audio in OBS?
No. OBS has built-in filters — Noise Suppression (RNNoise), Noise Gate, Equalizer, Compressor, and Limiter — that handle the job. Applied in the right order with good settings, they can make a budget USB mic sound professional.
How do I fix encoding overload errors in OBS?
Lower your encoder preset from P7 to P5. You can also switch multipass mode from two passes to a single pass. Both reduce GPU load with only a minor visual trade-off. If issues persist, consider lowering your output resolution or bitrate.