
Best Mic Settings for OBS Studio: Make Your Mic Sound Better
Your stream sounds mediocre — and it’s probably not your microphone’s fault. That’s mainly for your settings. Seriously, a $50 USB mic with properly configured filters will outperform a $300 condenser mic.
Want the best mic settings for OBS? This guide walks you through the exact filter chain in OBS audio that turns raw mic input into broadcast-ready audio. No third-party plugins, and you can finish it even during a coffee break.
Before You Touch a Single Filter in OBS
Before opening OBS Studio, you need three things dialed in: microphone positioning, your recording environment, and your input gain.
Get Your Mic Position Right
This sounds basic. But many microphones record from the top rather than the front, and assuming the wrong orientation means your filters are processing off-axis audio from the start.
Check your mic’s product page or manual to confirm the pickup direction. Once you know, position it about six inches from your mouth. Elagto Wave 3, for example, ball up your fist and hold it between your mouth and the mic capsule. Then, extending your hand open gives you the maximum range you should work within.
Treat Your Room (Even a Little)
A room with nothing, blank walls, and glass would make your sounds rougher. You don’t need a professional studio — just some soft surfaces. A rug, curtains, or even a bookshelf behind your monitor absorbs enough sound to make a real difference. The less your room reverberates, the cleaner your raw signal, and the better your filters perform on top of it.
Set Your Input Gain Before Anything Else
Your input gain determines how loud your mic signal is before OBS processes it, and getting this wrong means every filter you add is working with compromised audio.
Here’s how to do it:
- Open your Windows sound settings. Find your microphone under input devices and set the input volume to 100% (if your mic has a physical gain knob, you’ll fine-tune with that instead).
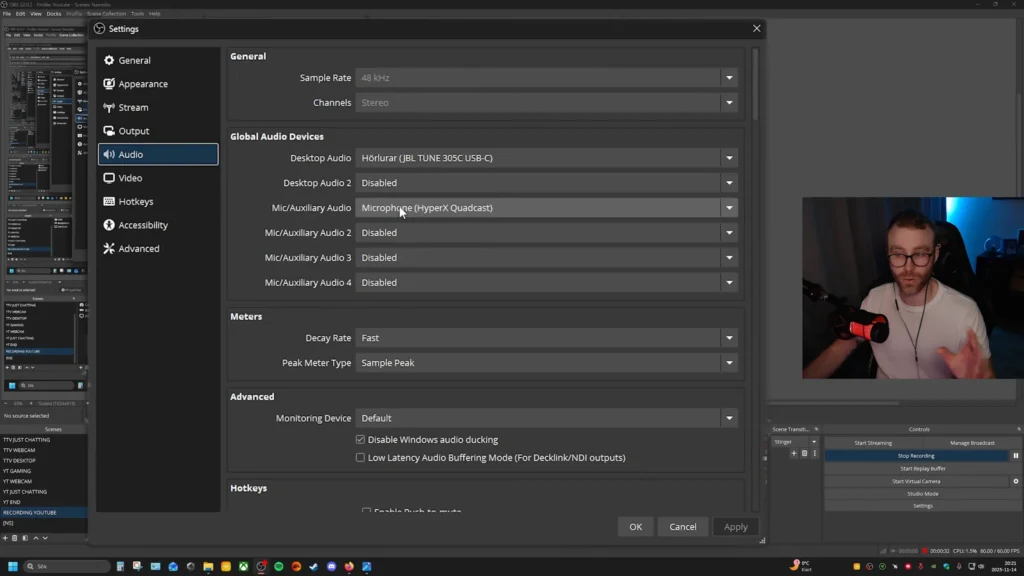
- Open OBS Studio and confirm your mic is selected under Settings > Audio.
- Set your sample rate to 48 kHz — the standard for streaming and recording.
- Talk at your normal speaking volume while watching the OBS audio mixer.
- Adjust your gain knob (or Windows input volume) until your voice lands in the middle of the yellow zone. You want consistent yellow. Never red.
One more thing: go to Advanced Audio Properties (click the three dots next to your mic) and set your mic to Mono. Unless you’re recording stereo instruments, this prevents the common issue of audio only coming through one headphone channel.
The Best Mic Settings for OBS: The Filter Chain
Now let’s dial in your mic settings for OBS. Filter order matters in OBS Studio. Each filter processes the signal and passes it to the next one, top to bottom. Here we go.
1. Noise Suppression
This goes first because you want to clean your signal before shaping it. Adding compression or EQ before removing noise just amplifies the junk you’re trying to get rid of.
To add it: click the three dots next to your mic in the audio mixer, select Filters, hit the + button, and choose Noise Suppression.
You’ll see a few method options:
- Speex — Low CPU usage, basic noise removal. Use this if you’re running a weaker system or playing CPU-heavy games.
- RNNoise — AI-based suppression with better quality but higher CPU cost. @MaDRocKGaming shared it in a HyperX QuadCast tutorial, “I’ve tested both, and I feel like RNNoise is a better thing. But if you have a potato computer, maybe try out Speex instead.”
- NVIDIA Noise Removal — Available on RTX 2000 series GPUs and newer. Delivers the cleanest results when available. You may need to download NVIDIA’s audio effects plugin separately (search “NVIDIA sound effects” — not the Broadcast app).
A key warning: don’t max out the suppression intensity. As @The Video Nerd cautions, “The more noise removal you add in any way, the more it will impact the sound of your voice, and it will muffle your voice if you do it too much.” Find the point where background hum disappears without your words sounding like they’re underwater.

2. Noise Gate (Optional)
A noise gate acts like a door. When your volume drops below a set threshold, the gate closes and silences the mic. When you speak, the gate opens.
This helps with consistent background noise between sentences — a mechanical keyboard, kids in the next room, a noisy fan. But it comes with a trade-off. Your voice would more like “now it’s off, now it’s on, off, on,” according to @MaDRocKGaming.
If you want to use it, here’s how to set it up:
- Close threshold: Stop talking and watch your audio meter. Note where your ambient room noise sits (commonly around -50 to -55 dB). Set the close threshold about 5 dB above that.
- Open threshold: Set this about 5 dB above your close threshold.
- Attack time: 1 ms (as fast as possible).
- Hold time: 250 ms (keeps the gate open briefly after you stop talking).
- Release time: 200 ms (creates a fade-out rather than a hard cutoff).

3. Three-Band Equalizer
OBS Studio’s built-in three-band EQ gives you control over the highs, mids, and lows of your voice. This is where you start shaping your sound — making it warmer, crisper, or fuller depending on your natural voice and your mic’s characteristics.
A major caveat: EQ is personal. “Every room, every microphone, and every single voice is going to be different.” Your EQ should show your personality. Toggle the filter on and off using the eye icon to A/B test. If the change sounds too dramatic, scale back.
Suggested starting settings:
- Highs: +2 dB. A slight boost adds clarity and helps your voice cut through game audio and music. Be careful pushing this too high — it can amplify sibilance (that harsh “s” sound). As one tutorial warns, boosting high frequencies too much makes the audio “basically sound like bacon cooking.”
- Mids: -2 dB. Pulling back the mids slightly reduces nasal or hollow qualities. As @Nightowl explains, “500 Hz is where nasal sounds kind of live in the human voice, so if I can scoop that out a little bit, it’s going to be less grating to listen to over a long period of time.”
- Lows: +2 to +3 dB. A small bass boost adds warmth. But if you already have a deep voice, reducing the lows. Meanwhile, if your voice sounds thin, a slight boost here fills it out.
For more advanced EQ, you can install a free VST plugin like TDR Nova, which offers a six-band parametric equalizer with high-pass and low-pass filters. But for most streamers and creators, OBS’s built-in three-band EQ gets the job done.

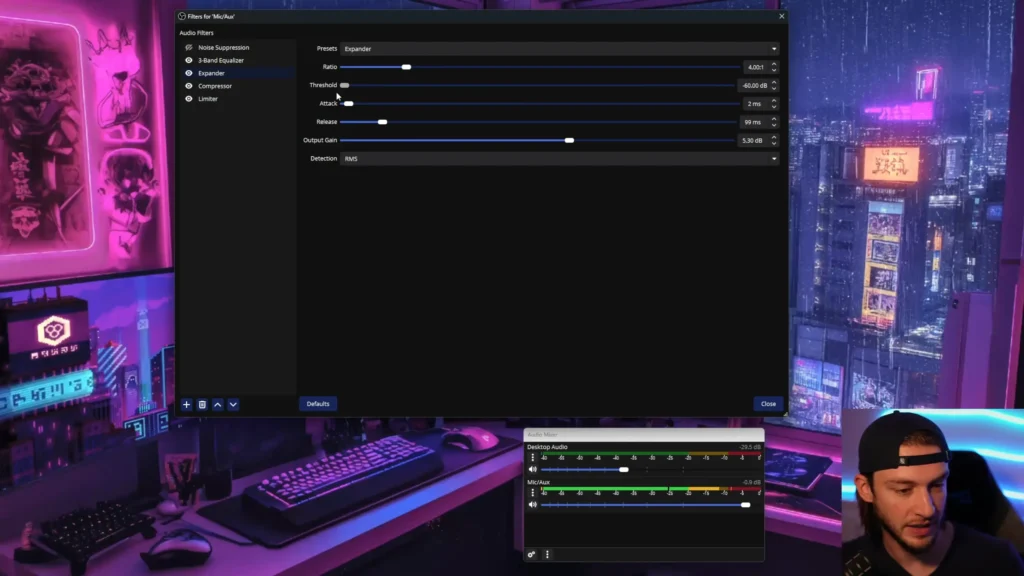
4. Expander
The expander is the unsung hero of a good filter chain. While the noise gate is a blunt on/off switch, the expander works more gradually — it reduces the volume of quiet sounds (keyboard clicks, mouse taps, controller buttons) without completely silencing them.
Follow the calibration process: type on your keyboard while slowly moving the threshold slider right, watching the audio mixer. Find the point where the audio mixer is basically not moving anymore while you’re tapping your keyboard.
Recommended settings:
- Ratio: 4:1
- Threshold: Start at the far left, move right while typing until the keyboard sounds disappear from the meter. Most setups land around -25 to -35 dB.
- Attack: 1–2 ms
- Release: 50–100 ms
- Output gain: After setting the threshold, your overall volume drops. Speak at your quietest on-stream volume and increase output gain until you’re back in the yellow zone.
5. Compressor
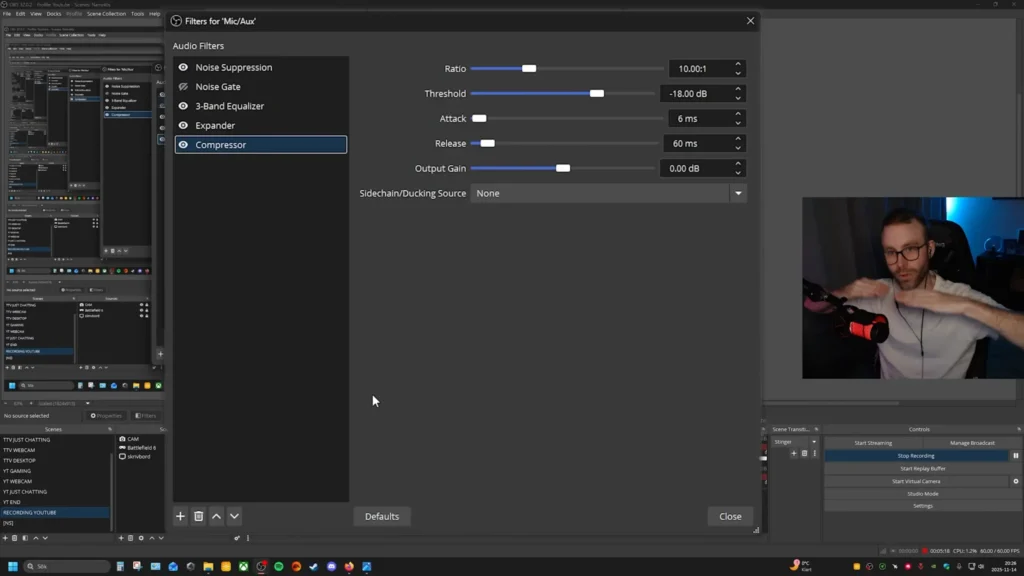
If the expander handles the quiet end, the compressor handles the loud end. It balances out the difference between your loud and quiet sounds, and that means that you can actually whisper really quietly as well as go really loud, and neither of those will sound unbalanced.
Don’t be afraid of the volume spikes, like shouting, laughing hard, or leaning into the mic, blast your audience. The compressor solves it well.
Here’s what each setting does:
- Ratio: How aggressively the compressor clamps down. A ratio of 3:1 or 4:1 works well. Going too high (like 10:1) makes your voice sound flat and robotic.
- Threshold: The volume level where compression kicks in. Start from the right, talk as loud as you’d ever get on stream, and drag left until your peaks stay in the yellow. Most people land between -15 and -23 dB.
- Attack: 1–6 ms. Faster attack catches spikes sooner.
- Release: 25–100 ms. Controls how quickly compression lets go after the loud moment passes.
- Output gain: The compressor makes your overall audio quieter. Bump it up (typically +3 to +6 dB) until your normal speaking voice hits around -5 dB on the meter.
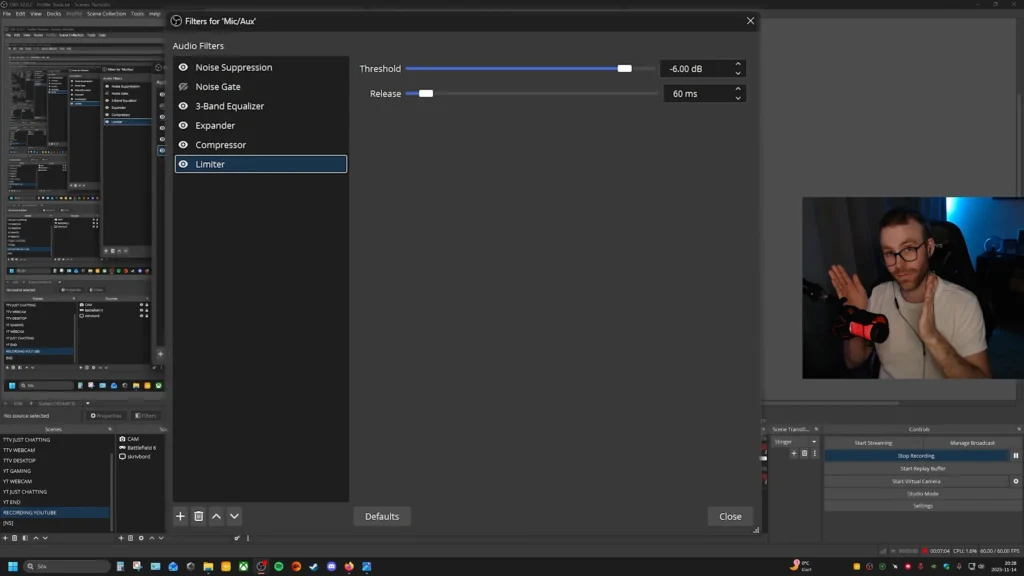
6. Limiter
The limiter is your safety net — a hard ceiling that prevents audio from ever crossing into the red, no matter what happens. @MaDRocKGaming puts it simply, “The limiter limits the audio. It’s just a brake, in a way.”
Settings:
- Threshold: -5 to -9 dB. This matches your compressor’s output target. @Jay Dunna sets his to -0.1 dB “just to make sure that we don’t go past the red line and lose any type of data associated with the audio.” A more conservative -5 dB gives extra breathing room.
- Release: 60 ms.
That’s it. The limiter doesn’t need much tweaking. It’s insurance against the unexpected — a sneeze, a scream, a slammed desk.
Bonus: Route Your OBS Filters to Other Apps
Your OBS filters only apply inside OBS by default. If you want that same processed audio in Discord, Zoom, or in-game voice chat, you need a virtual audio cable.
Download VB-Audio Virtual Cable (free). Then in OBS, go to Settings > Audio and set your Monitoring Device to “Cable Input.” Enable monitoring on your mic (set to Monitor and Output in Advanced Audio Properties). Now, in Discord or any other app, select Cable Output as your input device instead of your physical microphone.
Watch for a common issue: make sure the virtual cable output is set to mono (one channel, 48 kHz) in Windows Sound settings. Mismatched sample rates or stereo/mono conflicts can make your voice sound robotic.
The Takeaway on Best Mic Settings for OBS Audio
Good audio on a stream isn’t about expensive gear. Your best mic settings for OBS are about setting your gain correctly, applying filters in the right order, and testing each one against your specific voice and microphone. It’s about taking 15 minutes to configure the free tools already built into OBS Studio properly.
A few steps make your sound better. The difference will convince you that this was time well spent.
FAQs
What sample rate should I use in OBS Studio?
Set it to 48 kHz. This is the standard for both streaming and recording. You’ll find this under Settings > Audio. While you’re there, set your audio bitrate to 320 kbps under Settings > Output > Audio for the best sound quality.
Why does filter order matter in OBS?
OBS processes filters from top to bottom. Noise suppression goes first, so you’re cleaning the raw signal before any other filter shapes or amplifying it. Putting a compressor before noise suppression, for example, would boost the background noise along with your voice, making the suppression work harder and sound worse.
Can I use these settings with any microphone?
Yes. These filters work with USB mics, XLR mics through an audio interface, and everything in between. The specific threshold and EQ values will vary depending on your mic and voice, but the filter chain and approach stay the same.
How do I hear my filters in real time while setting them up?
Go to Advanced Audio Properties (three dots next to your mic), change audio monitoring to Monitor and Output, then set your monitoring device under Settings > Audio to your headphones. Remember to switch monitoring back to Off before going live.
My voice sounds robotic through the virtual audio cable. How do I fix it?
This usually happens because of a sample rate or channel mismatch. Go to Windows sound settings, find the virtual cable output device, and set it to one channel (mono), 24-bit, 48,000 Hz. This matches OBS’s output format and typically resolves the issue.