How to Record Vocal Covers at Home: 8 Step Complete Guide
A vocal cover is your own recorded performance of someone else’s song. Platforms like YouTube, Spotify, and SoundCloud are packed with creators who started exactly where you are right now: How to record vocal covers even when I’m at home? This guide will walk you through every step of the process, from treating your room acoustics to exporting a finished WAV file ready for upload. You just need a decent mic (or even just your phone), some free software, and the willingness to hit record.
Step 1: Set Up Your Recording Space
Your room’s acoustics directly shape how your vocals sound on a recording. Record in a reflective space (like a bathroom), and you’ll capture unwanted echo and reverb that no amount of editing can fully fix. Get the room right first, and everything downstream gets easier.
What to do
Find or create the most “dead” space in your home — meaning a spot where sound doesn’t bounce around. @MyAudioAcademy on YouTube shares his favourite “dead” space is the closet.
Your closet probably already has some heavy hoodies or just kind of heavy clothing, and what that does is it absorbs all of that sound reflection, and so obviously.
@MyAudioAcademy on YouTube
If you don’t have a suitable closet, position your mic in a corner of your room and surround it with soft, absorbent materials. Blankets, pillows, or a mattress propped up behind you can make a real difference.
Pro tips
- The clap test: Clap your hands in different rooms. If you hear a noticeable echo or ring, that room has too many reflections for a clean vocal recording.
- Budget sound panels: Foam acoustic panels are inexpensive and easy to mount. Even a few panels behind and to the sides of your mic position will tighten things up.
- Skip the bathroom. Tile and hard surfaces are the enemy of clean vocal takes.
Step 2: Choose and Connect Your Recording Equipment
Your equipment chain — mic, interface, cables, headphones — determines the raw quality of your audio. You can upgrade your sound dramatically without a massive budget if you choose the right pieces.
What to do
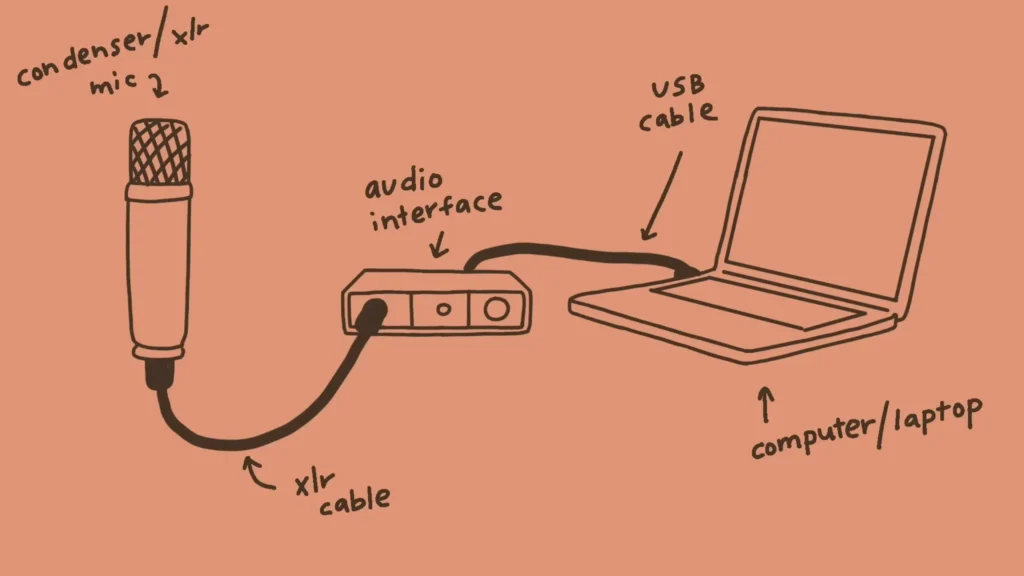
If you’re just getting started, a USB microphone like FIFINE AM8 is the simplest path. It plugs directly into your computer with a single cable — no interface needed. For better sound quality and more flexibility, step up to a condenser microphone paired with an audio interface like FIFINE SC3. The setup is straightforward: the mic connects to the interface via XLR cable, and the interface connects to your computer (or phone) via USB.
An audio interface converts your mic and instrument signals into a format your computer can work with. If your interface has multiple inputs (like the FIFINE AmpliGame SC1, the setup that @Jenudsstuff used to record her voice cover), you can record vocals and guitar simultaneously on separate tracks — a huge advantage when it comes to editing later.

Pro tips
- Condenser vs. dynamic mics: Condenser mics capture more detail and sensitivity, which is great for controlled home environments. Dynamic mics reject more background noise, making them forgiving in untreated rooms.
- Don’t forget monitoring. Plug headphones into your interface so you can hear yourself in real time while recording. This prevents audio from your speakers from bleeding back into the mic.
- Use a pop filter. Place it about a fist’s width from the mic capsule. It tames plosive sounds (hard “P” and “B” words) that cause ugly distortion in your recordings.
Step 3: Pick a DAW and Configure It
Choosing the right DAW and setting it up correctly makes a difference between a smooth session and a frustrating one.
What to do
For beginners, GarageBand (free on Mac/iOS) and Audacity (free on Mac, PC, and Linux) are solid starting points. If you’re ready to invest, Logic Pro, FL Studio, Ableton Live, PreSonus Studio One, and Pro Tools all offer deeper editing and mixing capabilities. Many interfaces (like PreSonus AudioBox models) bundle a DAW license, so check what’s included with your gear.
Once your DAW is open, head to the audio preferences and confirm your input device is set to your audio interface (not your computer’s built-in mic). Set your output to your headphones or monitors. Create a new project, select “Audio” as your track type, and you’re ready to go.
Pro tips
- Start free, upgrade later. Don’t let software cost stop you from recording today. GarageBand and Audacity handle covers beautifully at the beginner level.
- Save your project early and often. There’s nothing worse than losing a great take to a crash.
- Use recording templates if your DAW supports them. Templates with pre-loaded effects and routing save time and keep your creative momentum going.
Step 4: Prepare the Original Track
Your prepared backing track will keep your cover tight, in time, and easy to edit. Missing this step, you might meet sloppy timing and headaches during mixing.
What to do
First, get a legal digital copy of the song you’re covering — pull it from your iTunes/Music library, or use a purchased download. Import the MP3 (or WAV) into your DAW by dragging it onto a new track.
Next, set up a click track (metronome). Search the song’s BPM (beats per minute) online — a quick search like “Waiting on the World to Change BPM” will give you the answer instantly. Set your DAW’s tempo to match, then align the MP3 to the grid. Look for the downbeat of the drums (kick or snare) to find the right starting point.
Finally, turn down the original track’s volume. Professionally mastered songs are significantly louder than what your mic will capture. Dropping the fader to around -7 or -8 dB makes it easier to hear your own performance while recording.
Pro tips
- Automatic song length: In GarageBand, tap the “+” icon and set the section length to “Automatic.” Otherwise, your recording stops after eight bars.
- Can’t find the BPM? Tap along to the song using an online BPM tapping tool to figure out the tempo manually.
- Grid alignment matters. Even if it takes a few minutes to line up, a properly synced backing track makes editing and punch-ins dramatically easier.
Step 5: Dial In Mic Placement and Recording Levels
Your mic position and how hot your signal runs also matter for your voice-over recording. Get these wrong, and no plugin will save you.
What to do
Place the top of your microphone at about the level of your upper lip. This is also the usage of “proximity effects”. @MyAudioAcademy also prefers this position: “I like to put the top of the mic right at the top of the singer’s top lip. That’s a great starting point that typically works in most scenarios”. Also, a pop filter at a distance of about 4–6 inches will help you.
For recording levels, start your gain knob low — around the 9 o’clock position — and slowly increase it while singing at your normal volume. Watch the level meter in your DAW: you want the signal landing in the green to low-yellow range. If it touches red, you’re clipping, and that distortion is permanent.
Pro tips
- Proximity effect: Moving closer to the mic produces a warmer, richer tone. Pulling back gives a thinner but more natural sound — useful for louder, belting passages.
- Tilt trick: If your mic sounds too bright or harsh, angle it slightly downward. This rolls off some high-end frequencies without requiring EQ.
- Test your loudest part first. Have the singer deliver their most intense section before recording so you can set the gain to handle peaks without clipping.
Step 6: Record Vocals and Instruments on Separate Tracks
Recording each element on its own track gives you full control during editing and mixing. You can adjust the volume, effects, and timing of your vocals independently from your guitar, keyboard, or any other instrument.
What to do
@Annie Dang shares some basic setup in her video on YouTube: create a dedicated audio track for each source: one for vocals, one for guitar, one for any additional instruments. In your DAW, assign the correct input to each track (e.g., Input 1 for your mic, Input 2 for your guitar plugged into the interface). Enable monitoring on each track so you can hear yourself while recording.
Arm all the tracks you want to capture simultaneously, then hit record. Or record one track at a time — whatever feels more comfortable.
Pro tips
- Punch in for better takes. You don’t need to nail the entire song in one pass. Break it into sections — verse, chorus, bridge — and record each part separately. This keeps your voice fresh and helps you deliver stronger performances line by line.
- Warm up before recording. Run through your lyrics a few times, do some vocal warm-ups, and get comfortable with the song’s flow before committing to a take.
- Mute finished tracks while recording new ones to reduce distraction and keep your headphone mix clean.
Step 7: Add Effects and Mix Your Tracks to Taste
Raw recordings sound flat and disconnected. A basic mix with EQ, compression, and reverb brings your cover to life and makes it sound cohesive and professional.
What to do
Start with the basics on your vocal track: apply a noise gate to cut background noise between phrases, an EQ to shape the tone (cut muddy low frequencies, add a touch of presence in the high-mids), and a compressor to even out volume differences between soft and loud passages.
Then add reverb to give your vocal a sense of space and depth. A little goes a long way — start subtle and increase until the vocal sits naturally in the mix. Add a touch of echo/delay if the style calls for it.
Finally, balance your track volumes. If the guitar overpowers the vocal, pull it down. If the vocal is too loud against the backing track, lower its fader. In GarageBand, you can adjust each track’s volume by tapping the track and using the track volume slider.
Pro tips
- Use a limiter on your master bus. A limiter boosts overall volume while preventing clipping — essential for making your cover sound competitively loud next to professional releases.
- Less is more with effects. Over-processed vocals sound unnatural. If you’re unsure, dial back.
- A/B your mix by toggling effects on and off. If the track sounds better without an effect, remove it.
Step 8: Export and Share Your Finished Cover
So, you’re ready to export and share it. Pay attention to your format. The wrong export format can tank your audio quality after all the work you’ve put in.
What to do
Export your final mix as a WAV file at 24-bit, 48kHz. This preserves the full quality of your recording. Avoid exporting directly to MP3 — compressed formats lose fidelity, and streaming platforms (YouTube, Spotify) will compress your file again on upload, making MP3s sound noticeably worse.
In most DAWs, go to File > Export > Mix Down (or Bounce). Select the range of your song, choose the WAV format, confirm your bit depth and sample rate, and export.
If you recorded video alongside your audio, sync them in a video editor like Final Cut Pro, iMovie, or even a free mobile app before uploading to YouTube.
Pro tips
- Keep your project files. You may want to remix or re-export later. Never delete your DAW session after exporting.
- Name your files clearly. Something like “YourName_SongTitle_Cover_Final.wav” saves headaches down the road.
- Listen on multiple devices (phone speaker, car stereo, earbuds) before publishing. A mix that sounds great on studio headphones might reveal issues on smaller speakers.
Final Verdict on Recording Voice Covers at Home
You now have a complete roadmap for how to record vocal covers at home — from setting up your closet studio to exporting a polished track. Record often. Listen back critically, make adjustments, and record again. Every session teaches you something the last one didn’t.
Ready to share your first cover? Drop it on YouTube, post it to your socials, or send it to a friend for honest feedback. And if you want to level up your gear, check out FIFINE’s lineup of microphones and audio interfaces designed for home recording at every budget.
FAQs
Do I need an expensive microphone to record good vocal covers?
Not at all. A budget USB mic can produce clean, upload-ready audio for covers. FIFINE recording mics around $50-$60, like AM8 and Tank6, work well in voice covers. The biggest improvements come from room treatment, proper gain staging, and good mic technique — not from spending more on gear.
Can I record a vocal cover using just my phone?
Yes. Modern smartphones have surprisingly capable built-in microphones. Apps like GarageBand on iOS let you record, add effects, and mix directly on your device. It won’t match a dedicated condenser mic setup, but it’s a perfectly valid starting point.
What’s the difference between a USB mic and a condenser mic with an audio interface?
A USB mic connects directly to your computer — simple and portable. A condenser mic requires an audio interface (connected via XLR cable), which gives you better sound quality, lower latency, and more control over your recording signal. The interface also lets you record multiple sources (like vocals and guitar) simultaneously.
Why do my vocals sound echoey or roomy?
Your recording space is too reflective. Hard walls, floors, and ceilings bounce sound back into the mic. Move to a smaller, softer space (like a closet), add blankets or foam panels around your mic, and make sure you’re recording with headphones — not speakers — to prevent audio bleed.
What format should I export my cover in?
Export as a WAV file (24-bit, 48kHz) for the best quality. Avoid MP3 for your master export — streaming platforms apply their own compression, and double-compressing an MP3 degrades the audio noticeably. Save the WAV as your archive copy and let the platform handle format conversion.